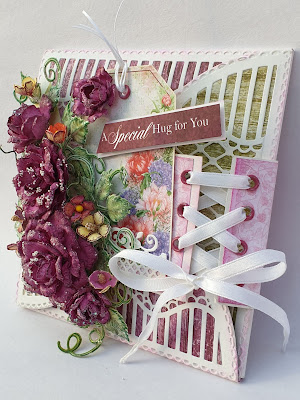
Special Hugs on Belly Band!🤗🤗
Hello Friend!!
I am here with very lovely card fill with all my love for my Husband. we completed 23 years of togetherness on 5th February 2020. He was super happy to get this lovely card. 💗💝
HC products:
I am here with very lovely card fill with all my love for my Husband. we completed 23 years of togetherness on 5th February 2020. He was super happy to get this lovely card. 💗💝
HC products:
Rounded Lattice Window Die, HCD1-7274
Rounded Sunlight Window Die HCD1-7272
Classic Rose Die, HCD1-7110
Classic Rose Cling Stamp Set, HCPC-3752
Classic Rose Paper Collection, HCDP1-270
3D Rose Shaping Mold, HCFB1-462
Leafy Accents Die, HCD1-776
Leafy Accents Cling Stamp Set, HCPC-3835
Leafy Accents Shaping Mold, HCFB1-467
Rajni Chawla's Crystal Clear, PGM15015
Other Products: white card stock for flowers and card base,hotglue, dries clear glue, wire stamens, micro mini pearls, satin twin, satin ribbon, 4mm eyelets
Inks: Archival Ink; plum, Leaf Green, Library Green, Sunflower, Lilac posies, Cactus Flower
Ready card measures 6” × 6”. First cut 6x6 card stock. To make interlocking cards take white cardstock
cut 2 circles using Rounded Sunlight Window Die. Score both circles from center and make them 4 half
circles. Cut 4 hinges and add one part with half circle and another with base. as shown in pictures.
Cut 4 half circles using die cuts from window scene paper collection. Adhere them on created interlocking card base. Cut Half circle decorative die cuts from white cardstock using dies. Distress die cuts with cactus flower ink and mat them on top as shown.
Cut 4 half circles using die cuts of scenes from window scene paper collection. Adhere them inside of interlocking card half circles and one on base. Make matted belly band and add make holes using eyelets at both ends of band. Make pocket using border die cut for tag as shown in picture.
Cut 4 half circles using die cuts of scenes from window scene paper collection. Adhere them inside of interlocking card half circles and one on base. Make matted belly band and add make holes using eyelets at both ends of band. Make pocket using border die cut for tag as shown in picture.
For flowers stamp Classic Roses on white flower paper with archival Plum multiple times. Cut with coordinating die. Color with plum, Lilac Posies and Cactus Flower front and back both. For fillers add Archival Sun Flower. Shape them using shaping mold. For big rose use 3 big flowers 2 medium flowers and 2 flowers 3rd big. Add micro pearls using dries clear glue. Add glitter too. Stamp Leaves on white paper using Leafy accent stamp set with archival Library Green and cut them coordinating dies. color using Leaf Green and Cactus flower. Shape them using Leafy Accents 3D Shaping mold. Add glitters with dries clear glue. Arrange all flowers and leaves on a band as pictured
And glue it on Belly Band with hot glue , but keep in mind pocket should not be glued. Add small rose bud, satin twin and sentiment on tag. Tie white satin ribbon in eyelets holes as pictured.
Stamp Rose image on white paper and color with pencil color and water color brush pen. Cut one heart using heart dye cut from my stash. Distress the edges with Cactus Flower and adhere it with foam tape. hot glue color image Add picture or sentiment in Heart shape.
Some more pictures are here with closeup look
Hope you enjoyed the tutorial.
Thanks for stopping by
Hugs
Madhu Biroliya
Entering in
craftyfriendschallengeblog
craftyfriendschallengeblog


Wow! no wonder he was so happy with his card, it's awesome! Thank you so much for the step by step
ReplyDeleteThank you so much.
DeleteThis is a stunning make Madhu, beautifully created, not surprised he loved it. Congratulations on your Anniversary xx
ReplyDeleteThank you so much.
DeleteIt's amazingly amazing ma'am. Congratulations for 23rd anniversary. May this togetherness continue to many more years of love laugh n blessings
ReplyDeleteThank you so much.
DeleteSuch a beautiful creation Madhu ji ...especially love the belly band
ReplyDeleteCheers
Dr Sonia
Thank you so much...Hugs n cheers
Delete