Showing posts with label birthday card. Show all posts

Monday, 2 March 2020

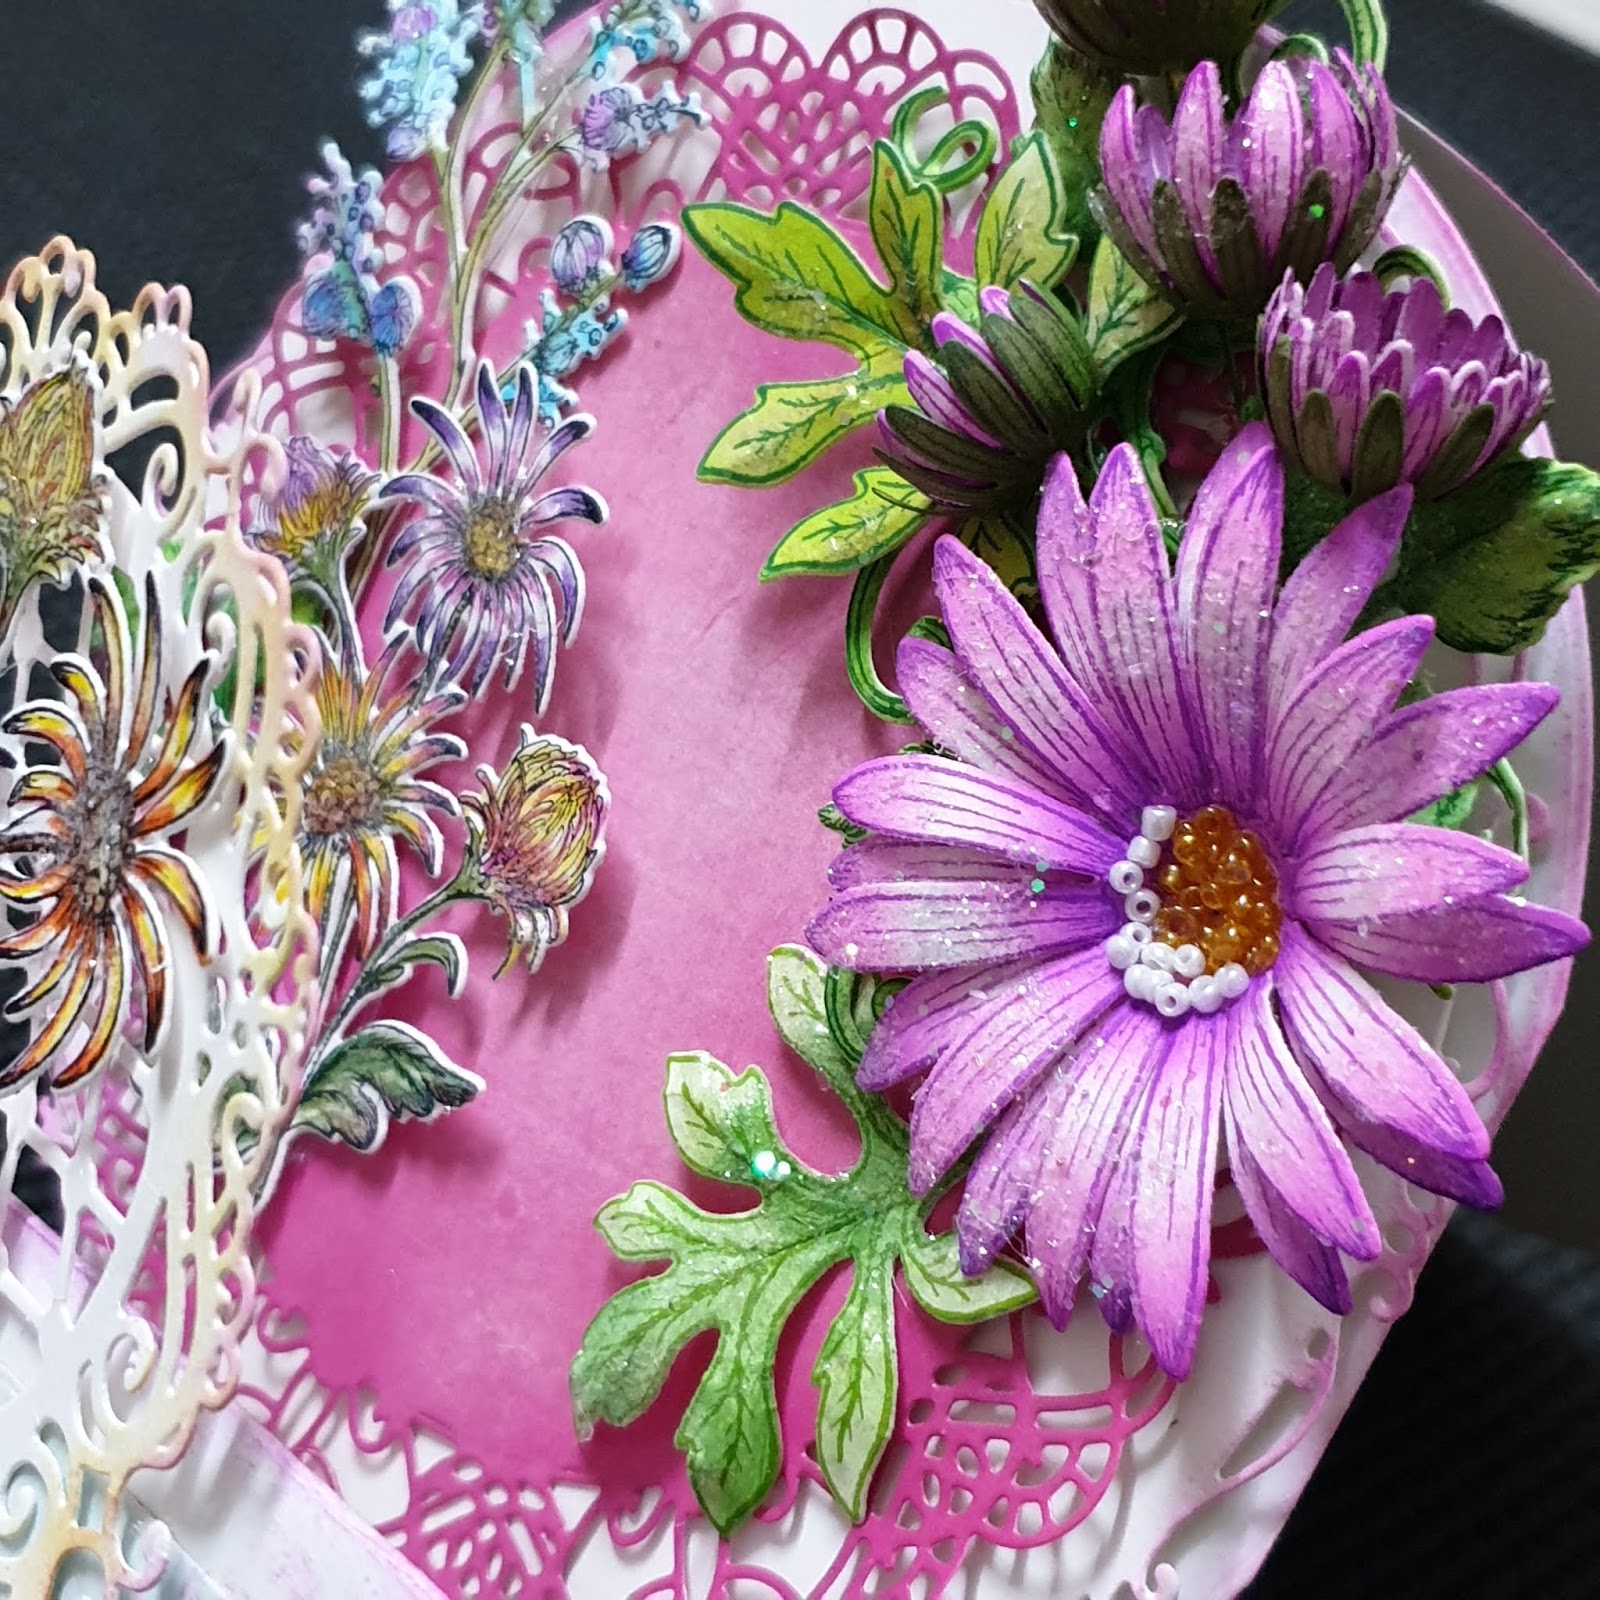
Glittery Aster's circle world!

Glittery Aster’s Circles World! 

Hello friends!
I am here with folded circle easel birthday card with some tips.


HC PRODUCTS USED: 
Rounded Window Frame Die, HCD1-727

Other products: Icraft flower shaping paper super white, white cardstock, pink card stock, pearls, glass beads, wire, hot glue, dries clear glue,
Inks: Archival – Cactus Flowers, Majestic Violet, jet Black, Library Green, Leaf Green, Memento: Lilac Posie, Colour pencils, Zig Marker

Products can be buy from
USA  Heartfelt Creations
INDIA crafterscorner
INDIA   Icraft Flower Paper

Note:  At the end of blog you will get some tips.


For more tips on creating with the Window Scene cards & dies, watch the tutorial at 

For more tips on creating with the Wild Aster Collection, watch the tutorial at https://youtu.be/1mriCKqh-Ac.

Instructions: Take a square card base 6” x 6”. Cut using Rounded Sunlight Window die extending over the top of the fold of the card. Run the card through die cutting machine so when the card is opened it will still be intact. Now cut 3 circles using same window die. Fold all 3 circles into half. Attach them together with the help of hinges. Also attach with 6x6 circle card base. Now card base is ready. See the picture it looks like this.


Cut circle card mats from Window Scenes Paper Collection using Rounded Sunlight window die. Cut them into half. To give some more creative look use 2nd large doily die cut as a stencil from Rounded Window Frame die. Do stenciling using Rounded window frame 2nd die as stencil with pink posie memento ink. Adhere on folded card mats. See the picture.


Now cut 3 dollies from white cardstock using 3rd and 4th doily from Rounded Window frame die. Distress the edged using sunflower and cactus flower archival inks. Cut one doily from deep pink card stock using 2nd largest die from Rounded Window Frame die. And distress the edge using memento Lilac Posie ink ans yellow ink. Glue these dollies on folded card as shown in the picture. Add half small pearls on doily net.

Stamp aster flowers on flower shaping paper using cactus flowers and majestic violet archival ink and cut with coordinating dies. Sponge flowers using cactus flower, shape flowers using ball tool. Layer big flowers and add yellow and white glass beads in center using clear adhesive. Create one flower inward fold as shown in picture Shape the small asters into bud form using two petals and single petal, and pair with green aster for a realistic bud look with wire stamens. For green aster stamp on green card stock with Library Green. Cut with coordinating dies.    
Stamp aster leaves using library green ink and cut with coordinating die. Paint leaves using leaf green ink. Shape leaves using ball tool. Stamp leaves with Leafy Accents Cling stamp set with Library Green, color with leaf green, cut with coordinating dies. Shape with 3D Leafy Accent Shaping Mold.   
Stamp image with Wild Aster Spray Cling Stamp Set with Black Archival and color with pencil color and zig marker. Cut with coordinating die.
Add crystal clear on flowers, leaves and sprays using dries clear glue.
Arrange flowers, leaves and sprays on all layers and glue them with hot melted glue. Add tag.
Enjoy more pictures.


Tip: for fast working I washed back of sheet with green water or acrylic paint. Like pictures...


For aster flowers, painted thin mauve paint to the back of petals and buds petals. Like picture...

If you liked put some comments in comment box.

Thanks for stopping By.
Hugs
Madhu Bairoliya


Tuesday, 7 January 2020

Have a Wonderful Day!

Have a Wonderful Day!

Hi Friends!!
Today I'd like to share a simple and quick card.

 Heartfelt Creations Products:


Calla Lily Cling Stamp Set, HCPC-3897
Rajni Chawla's Crystal Clear, PGM15015
Ornate Border and Pocket Die,  HCD1-780


Inks: Archival ink- Library Green, Vibrant Fuchsia, Leaf green, Sun Flower,Jet Black
Distress ink Peeled Paint, Memento Bamboo leave,


Other Products: White cardstock, Satin twine, wire, stamens, Green micro beads, 3D foam tape, 3mm satin ribbon


For more tips on creating with the Calla Lily Collection watch the tutorial at https://youtu.be/VWKPoXjpiug.


products can buy from 
USA HEARTFELT CREATIONS

Instruction : Side fold Ready Card size 4-1/4” by 6-1/4”

Take 8-1/2” by 6-1/4” card stock score at 4-1/4” and fold. Adhere4" by 6" pattern paper from designer paper collection with 3D foam tape. in rest white part glue 3mm satin ribbon. Glue one bow and pearl.


Mat 1” by 4” pattern strip on white cardstock and adhere on base with 3D foam tape. Attach ORNATE BORDER AND POCKETS diecut facing down it pictured.
Flowers:  Now stamp Calla Lily flowers on white Dress My Craft Paper using Memento Bamboo Leave, cut them with coordinating die and color them with Archival sunflower and Leaf green both sides. Stamp Leaves with Stazon Olive Green and color with Leaf Green and Memento Bamboo Leaves and with coordinating die.  When this is done, bring shape to them by using the 3D Calla Lilly mold that comes with the collection, using the shaping tools when needed. Adhere the stamen to the lily center using the hot glue gun.
Adhere it to the card front as shown. Adhere a bow made with satin ribbon on the stem of the bouquet as shown. Adhere few Clear Dew Drops on flowers. 

some more pictures..


Thanks for stopping by
Hugs
Madhu Bairoliya 

instagram

Saturday, 30 November 2019

MERRY CHRISTMAS!!..Blue Aster

Merry Christmas Blue Aster!🎅🎄

Hey Crafty Folks!!

Good Morning.....


Have you started your Christmas projects yet or are you still looking for inspiration? Are you looking to get a jump start on your Christmas creativity but you have no idea where to begin? step wise tutorial for Booklet card your friends and family will love this Christmas!!

Product used: 

HCPC-3887 Wild Aster Cling Stamp Set
HCD1-7257 Wild Aster Die
HCD1-7119 Classic Border Basics Die
HCD!-7161 Sweet Heart Border Die
HCST1-401 Deluxe Flower Shaping Kit
Dress My Craft Floral Oriental Paper
Rajni Chawla's Crystal Clear

 Ink: Manganese Blue, Library Green Archival Ink, Memento Grape Jelly, Distress ink  salty ocean, Peeled Paint, versamark

 OTHER PRODUCTS :
White card stock,  glass beads (yellow brown), diamond dust, pollen, peals, hot gluegun, tackey glue,  satin cord, snowflakes embossing powder,

PRODUCTS Store link 
USA  Heartfelt Creaftions
In India  CRAFTERS CORNER


Let's get crafting together!


Ready card size is 6" x 8 3/4 "
Create Booklet From Border die!


Step 1: Mark center onto 2 pieces of white card stock measure 4x6" and also mark center on basic border die, cut both side with die cutting machine.


 Step 2: Cut decorative borders form classic border basic dies and sweetheart border dies same as shown in picture.


 Step 3: Distress the borders with salty ocean distress ink and adhere both side as Shown in a picture. 


 Step 4: Create own pattern paper (can be use designer paper) using distress peeled paint. Stamp trees and bubbles  from cottage candy cane collection with library green archival ink.


Step 5:  Adhere two more borders from Sweetheart border dies and mat hand created pattern paper onto white booklet base giving 3D look.Now booklet base is ready.

Flower Instruction:


Video Link: For more tips on creating with the Wild Aster Collection watch the tutorial at https://youtu.be/1mriCKqh-Ac


Step 1: Stamp the Wild Asters onto DRESS MY CRAFT FLORAL ORIENTAL PAPER using versamark clear ink. Apply snow flakes embossing powder and heat set. Cut with coordinating die.


 Step 2: Stamp the Asters onto dress my craft FLORAL ORIENTAL PAPER  using Manganese Blue archival ink. Cut with coordinating die.  Color the centers using Memento Grape jelly ink and color the outer petals with Manganese Blue.


Step 3: For buds color petals from back with blue and grapes jelly too.
For more tips on creating with the Wild Aster Collection watch the tutorial at https://youtu.be/1mriCKqh-Ac


 Step 4:  Dip petals in water for 3 to 4 seconds and semi dry on tissue or any cotton cloth.


 Step 5: Use a ball tool from the Deluxe Flower Shaping kit to shape the petals. Place the tool at the outer edge of the petal, press down with an even pressure and roll the ball tool to the base of the petal with one stroke.


Step 6Stamp leaves on Dress My Craft FLORAL ORIENTAL PAPER  with Library Green archival and cut with coordinating dies. Color the leaves using distress Peeled paint and Library on edges. Bring shape to the leaves by using the tools in the 3D flower shaping kit. 


Step 7: Turn the flowers face up and using a ball tool, make circles in the centre of the flower to curl the petals into an arch shape. Adhere 2 sets of same size petals together using the clear glue, offsetting the petals to create a fuller flower. 


Step 8:  For flower center use pearls, glass beads, pollen. Make buds with Wild Aster"s smalle die cut. 
 White card base is measure 6"x8.75" top fold card. Mat another white card stock 5.5" x 7.5" on it. Mat designer paper 1/8" smaller. Now adhere ready booklet frame.


Step 9: 
Position the flowers and leaves onto the card base and secure using hot glue.
Hang sentiment from paper collection.


Thanks for stopping by
Hugs 
Madhu Biaroliya 

Monday, 17 June 2019

Mixmedia happy for you card

Mixmedia card "happy for you "

Hello crafty Friends !!!!

Today I would love to share a very beautiful and lovely mixmedia card 💝


Products have been used
Classic Rose Die, HCD1-7110

Craftyscrappers products...
Dazzaling paste


Brief Tutorial
  1. First take a plastick sheet and rub pink Premium-Waterreactive-Inkpad(COTTON CANDY)      bluePremium-Waterreactive-Inkpad(ARCTIC) and yellowPremium-Waterreactive-Inkpad(DAFFODIL)  ink from craftyscappers and spay water put a cardstock and press from back. 
  2. Now dry with heat tool.
  3.  Apply Dazzle Texture Paste-BALLET using stencil and dry with heat gun.
  4. apply purple ink on it with light hand.
  5. Matting on purple card stock.
  6. take one more white card stock and put stripes stencil from stash and apply Premium-Waterreactive-Inkpad(COTTON  in check style.
  7. For the flower use heartfeltcreations classic rose stamped and cut with coordination dies.
  8. colour the petals with craftyscrappers Premium-Waterreactive-Inkpad(CARROT and shape the petals with hatfeltcreations shaping mold.
  9. Apply some Dazzle Texture Paste-BALLET on flowers.                                                         
  10. Add lace from the stash with hot glue on back of the textured paper.
  11. First adhere pink check paper on white card base.
  12.  Now place purple matted paper  (mixmedia background)
  13. Arrange the flowers with leaves corrugated paper and some decorative die cut from the stash.
  14. stamped butterfly.
  15.  Adhere mini pearl with glossy accent.
  16. Adhere sentiment.  Now card is ready.
Here is some more pictures!!


This is all from my side. 

I hope you liked this project.
Do let me know how you like this project in the comments below.Until then Happy Crafting 🙂
Hugs
Madhu Bairoliya


Wednesday, 27 March 2019

Craftyscrappers Blog Hop

HELLO CRAFTY TOURISTS
WELCOME TO TOWN CRAFTYSCRAPPERS
We are proud citizens of town Craftyscrappers. Our crafty town is being run by Mayor.Konica Das and Deputy Mayor.Jesse Zedek.
This month we are celebrating 6th birthday of our town and we like to invite you to visit my crafty castle/museum/handmade store (choose any one). Every year, we have crafty tourists visiting our town and joining us in celebration.
We invite everyone to join us on this occasion and hop on & off our crafty bus.


Our blog bus runs from April 2 until April 16 and we have prizes for a lucky visitor on May 5, who will receive lovely gifts from us.
I welcome you to see one of my unique crafty creation made for this

    A brief tutorial:


  1. Take a white card stock 4 X 5.75 used golden heat embossing powder with scripted butterfly background.
  2. set layering stencil on white paper for flowers..... 
  3. yellow flower..... base with Buttercup shimmer paste, and after drying apply any two deep yellow distress ink.
  4. pink flower.....  Shimmer paste Cupcake any appy two dipper shades
  5. Blue flower..... base with Martina shimmer paste   apply any two dipper shade  
  6. leaves...... Simmer paste - Stem shade with distress ink pealed paint and mowed lawn
  7. Make center step card base with 6x7.5 white card stock. 
  8. Both side boder used white heat embossing powder using caftyscrappers border stamp set and apply three distress ink for color background.
  9. stamp balloons from Celebrate holi stamp set and fussy cut and stick on crafty scrappers element sheets
  10. Birthday tag with white heat embossing and distress background with marmalagoon ink.
  11. set all objects with blue matting paper on the card base.
  12. Add sentiment with foam tape.
  13. And the card is ready.   


Some closup look


Thank you for visiting my place. Hop on and get off at the next stop (MEENAKSHI SHANKAR) and enjoy marvellous master piece created for you.