Showing posts with label Home Decor. Show all posts

Wednesday, 2 February 2022

Create Your Own Radiant Sunflower Lantern

"Create Your Own Radiant Sunflower Lantern"

Hello crafters,

Paper lantern and lamps are one of the most creative and elegant ways to decorate your house. They ensure that the house is always lit up warding away evil and also being a source of light and inspiration for many. Looking forward to seeing other renditions of my creations.


Heartfelt Creations Products:

Rustic Sunflower Cling Stamp SetHCPC-3962

Rustic Sunflower DieHCD1-7364

3D Rustic Sunflower Shaping MoldHCFB1-5009

Simply Classic Oval Frame DieHCD2-7382

Peony & Sunflower Banner Cling Stamp SetHCPC-3970

Peony & Sunflower Banner DieHCD1-7378

Leafy Accents Cling Stamp SetHCPC-3835

Leafy Accents DieHCD1-7193

3D Leafy Accents Shaping MoldHCFB1-467

Deluxe Flower Shaping Paper Pack of 50 - WhiteHCPP1-475

Deluxe Flower Shaping KitHCST1-401

Rajni Chawla's Crystal ClearPGM15015

Designer Dries Clear Adhesive159723

For more tips on creating with Heartfelt Creations dies, watch YouTube tutorials from the link below

How to Create Floral Banners and Borders the EZ Way

Rustic sunflower die

Other Products: Archival Ink Red Geranium, sunflower, Dandelion, Sepia, Olive Green, Leaf Green, White card stock, Gold Cardstock, Vellum paper, Trimmer, Glossy accent, Blue flower pearl, Score Board, Hot Glue Gun, Floral Tape, Floral wire, 8mm Styrofoam buds, 6mm Styrofoam buds, scissor.


Instructions: -
Steps For Lantern Base

Step 1: Cut a piece of cardstock of size 6 1/4" by 8".  Score at 1/2" on the longer left side and shorter at the top and bottom.


Step 2:  Align Simply Classic Oval Frame Decorative die leaving some space the score line and cut as shown. Need 4 pieces like this.


Step 3: Cut 4 pieces of vellum cardstock of size 5 3/4" by 6 1/2", glue it on the backside of the die cut pieces and fold the scored lines. Connect all the sides by gluing the scored folding edge on the back of each die cut piece.

Step 4: Connect all the sides by gluing the scored folding edge on the back of each die cut piece.

Step 5: Take white cardstock and die cut using simply Classic Oval Frame Decorative die no. 2, 3, 4 and 5 create two sets and make another set of two using die no. 2 and 3. Glue them on vellum sheet alternatively. 


Step 6: Now procced to stick all the bases together to form a box. Now the Lantern base is ready.

Final Steps

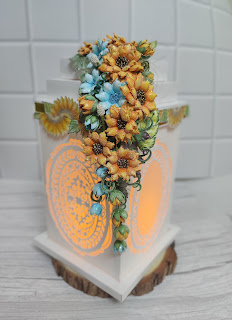
Now prepare shadow boxes of 4 different sizes. One for bottom 7 by 7” and height 1/2” and Three for the lantern head. The shadow boxes will be of the sizes 6 by 6" and height 1”, 5" by 5" and height 1", 4 by 4” and height 1", respectively.

Now stamp the Flowers from the Rustic Sunflower Cling stamp set on Deluxe flower shaping paper using Archival ink Red Geranium. Cut them using coordinating dies. Color them using Sunflower and Dandelion with little touch of Sepia Archival ink. For the blue Sunflower stamp with Forget Me Not ink. Cut with coordinating dies. Color using same ink and center Bluebird Archival Ink. Mist the flowers and shape them using ball tools. Pinch the tip for more realistic look. Create 3 flowers using 2 big flowers, 1 medium, and 1 small flower die cut. Create rest yellow and blue flowers using 2 and 3 flowers die cut. Create flower center using copper glass beads and blue flower pearls using glossy accent.

Create some blue buds and yellow buds using small and 2nd small flower die cut for center using Styrofoam buds as pictured. Create pearl fillers using earbuds and white flower pearls. Stamp the leaves from the Rustic Sunflower Cling stamp set and Leafy accents cling stamp set and using Archival Olive green. Cut them using coordinating dies and color Leafy accent cutting with olive with a touch of Sepia. Color Rustic Sunflower leaves with Leaf green ink Archival Ink. Shape them using the 3D Shaping molds

Stamp the Sunflower banner with black archival ink on white cardstock using Peony & Sunflower Banner Cling Stamp Set. Paint using pencil colors Cut with coordinating dies. Split in two parts and use it as a border shown in picture.

Adhere shadow boxes on top as pictures. Adhere golden strip on 6 x 6” shadowbox. Glue colored sunflower banner die cut to the sides of the 6 X 6 shadow box as shown in the picture.

Arrange the flowers and leaves on top of the lantern using hot glue as shown. Add Rajni Chawla Crystal Clear using Designer Dries Clear Adhesive.

Keep flameless candle in bottom shadowbox. Place the lantern on top of a Flameless Candle.


I hope you enjoyed the tutorial. 
Thanks for stopping by,
Hugs,
Madhu Bairoliya.

Blog: https://thecraftplanet1.blogspot.com/
Instagram: https://www.instagram.com/madhu.bairoliya/
Facebook: https://www.facebook.com/craftplanet1
You Tube: https://www.youtube.com/channel/UC9wvBSioU9AyVN_INLcTk9g

Friday, 6 March 2020

Light up the Darkness!!

Light up the Darkness!!

Hello friends!
Today I am here with step wise tutorial for a beautiful home decor lantern. 


"Learn to light a candle in the darkest moments of someone’s life. Be the light that helps others see; it is what gives life its deepest significance."

Heartfelt Creations products has been used:

Product can buy:
India  Crafters Corner

Other Products: Dress my craft white card stock , ICRAFT flower shaping paper, DMC micro mini pearls beads, hot gluegun, hotglue, Dries clear glue, vellum sheets, red tacky tape, stamens- thread and wire, crystal clear glitter, sparkling dust.

Ink: Archival- plum, cactus flower, rose madder, tea rose, vivid chartreuse, leaf green, library green, pale ochre, Memento- lilac posies, pink peony , rose madder, stazon- olive green.


Instructions:-

Step 1: Take 2 pieces of 6x6 300 gsm DMC white cardstock and vellum sheets. Cut circle using Rounded sunlight window die. As shown in picture.

Step 2: Cut white circle cardstock using both designers die from Rounded Lattice Window die. As pictured.

Step 3: Take 2 strips of white cardstock measure 3 ¼” x 12”. join both 
with the help of red tape. See in the picture.

Step 4: Now cut the fringes with the help of fringes scissor or normal scissor.

Step 5: Now cut design using Elegant Pocket Accents die at side of the lantern. As pictured.

Step 6: Now adhere vellum circles at the back of the doilies using red tape. As pictured.

Step 7: Adhere vellum back of the side strip with clear glue. As pictured.
Step 8: Add magnets for closure.

 
Step 9: Attach decorative die cut strip fringes using clear glue with 1 doily by leaving 4” open. This is the flap to open the lantern and flame-less candle can be kept. Cut extra part of decorative strip. 

Step 10: Before adhering second doily, first check magnets closure working fine or not.

Step 11: Now adhere second doily. Magnet closure Lantern base is ready.

Like this create 2 lanterns. Distress the edges with memento Lilac posies.

Flowers:
For more tips on creating flowers with Sweet Peony collection, watch the tutorial https://youtu.be/L9_MLkvpGPQ

For more tips on creating with the flower shaping mold, watch the tutorial https://youtu.be/KDbdzC0MnAI


Maroon sweet peony flower: Stamps multiple flowers using small sweet peony stamp with archival plum ink. Cut with coordinating dies. Color using lilac posies and archival plum both sides. Add white thread stamens. Add glitter using dries clear glue. Create fillers with smallest petals and color using any yellow color. As pictured.

White Rose: Stamp multiple classic rose flowers using archival pale ochre. Cut with coordinating dies. Shape them using 3D shaping mold. create flowers. Add micro mini pearls using dries clear glue. Add glitters using dries clear glue.


Maroon roses: Stamp multiple classic rose flowers using archival plum. Cut with coordinating dies. Color with lilac posies, plum and cactus flower. Shape them using 3D shaping mold. create roses. Add glitter using dries clear glue. Now add micro mini pearls on tip also. Add glitters using dries clear glue.
Create two Small roses for fillers with small flower from classic rose. Color with Rose madder and tea rose archival ink. Create fillers using any smallest flower from any die cut. Color with any shade. Add wire stamens.


Wild Aster: Stamp wild aster flowers multiple times using archival vivid chartreuse and color with same. Cut with coordinating dies. Turn the flowers face up and using a ball tool, make circles in the center of the flower to curl the petals into an arch shape. Adhere 3 petals together using the clear glue, offsetting the petals to create a fuller flower add one inward flower like ball. As shown. 
Create one flower with 2 medium petals and add one inward curl petal. Create medium flower using medium petals off set. Take 6mm Styrofoam bud color with plum add with white and yellow thread stamens. Create buds with small petals and Pierce a hole through the centers, add mini pointed green thread stamen through, attaching with hot glue. As pictured. Add crystal clear glitter using dries clear glue.

Stamp the leaves from the leafy accents cling stamp set using archival Library green and color using peeled paint and library green. Stamp Pansy stamp using stazon olive green colur with same and leaf green and give touch of cactus flower archival ink. Cut with coordinating die. Shape the leaves using the 3D Shaping mold. Add glitters using dries clear glue.


When all the elements are ready decorate both lantern from both side in desire manner with hot glue. As pictured


I hope you enjoyed the tutorial. love to here from you.
Thanks for stopping by
Hugs
Madhu Bairoliya.


Tuesday, 8 January 2019

Altered plastic jar into dry fruit jar

Altered plastic jar in dry fruit jar!


 Stamped which I used @craftyscrappers  border festiveborder
1.      Stamped and colored all the border with watercolor brush pens.
2.      Fussy cut stamped image
3.      Score at every one interval.
4.      Glued both ends together.


  • 5 Glued both end like figure 5
  • 6 colored another border.
  • 7 cut 4 pcs of circles bigger to small.
  • 8 Adhere all together with hot glue
  • 9 like figure 9.


  • 10 cover center of jar with red card stock.
  • 11 Glued lace top and bottom of red paper and in the middle colored stamped border.
  • 12 like figure 11 and 12
  • 13 Now I hanged pearl in rosettes. Figure 13
  • 14 Role pompom lace in circle.
  • 15 First glued chipboard circle cutout in rosettes.
  • 16 Glued this rosette on the lid with the help of hot glue.
  • 17 Glued white pompom in circle on top of the jar cap and decorate with red and yellow pompom too.
  • 18 Embellished with pearls.


ThankYou!
Please feel free to leave your comments.

Madhu Bairoliya