Light up the Darkness!!
Hello friends!
Today I am here with step wise tutorial for a beautiful home decor lantern.
Today I am here with step wise tutorial for a beautiful home decor lantern.
"Learn to light a candle
in the darkest moments of someone’s life. Be the light that helps others see;
it is what gives life its deepest significance."
Heartfelt
Creations products has been used:
Wild Aster Die, HCD1-7257
Wild Aster Cling Stamp Set, HCPC-3887
Cheery Pansy Die, HCD1-7222
Cheery Pansy Cling
Stamp Set, HCPC-3862
3D Pansy Shaping
Mold, HCFB1-473
Small Sweet Peony
Die, HCD1-7173
Small Sweet Peony
Cling Stamp Set, HCPC-3819
Leafy Accents Die, HCD1-7193
Leafy Accents Die, HCD1-7193
Leafy Accents Cling
Stamp Set, HCPC-3835
3D Leafy Accents
Shaping Mold, HCFB1-467
Rajni Chawla's
Crystal Clear, PGM15015
Deluxe Flower
Shaping Kit, HCST1-401
Other Products: Dress my craft white card stock , ICRAFT flower shaping paper, DMC micro mini pearls beads, hot gluegun, hotglue, Dries clear glue, vellum sheets, red tacky tape, stamens- thread and
wire, crystal clear glitter, sparkling dust.
Other Products: Dress my craft white card stock , ICRAFT flower shaping paper, DMC micro mini pearls beads, hot gluegun, hotglue, Dries clear glue, vellum sheets, red tacky tape, stamens- thread and
wire, crystal clear glitter, sparkling dust.
Ink: Archival- plum,
cactus flower, rose madder, tea rose, vivid chartreuse, leaf green, library green, pale ochre, Memento- lilac posies, pink peony , rose madder, stazon- olive green.


Instructions:-
 Step 1:
Take 2 pieces of 6x6 300 gsm DMC white cardstock and vellum sheets. Cut circle using
Rounded sunlight window die. As shown in picture.
Step 1:
Take 2 pieces of 6x6 300 gsm DMC white cardstock and vellum sheets. Cut circle using
Rounded sunlight window die. As shown in picture.
 Step 2:
Cut white circle cardstock using both designers die from Rounded Lattice Window
die.
Step 2:
Cut white circle cardstock using both designers die from Rounded Lattice Window
die.

 Step 3:
Take 2 strips of white cardstock measure 3 ¼” x 12”. join both
with the help of red tape. See in the picture.
Step 3:
Take 2 strips of white cardstock measure 3 ¼” x 12”. join both
with the help of red tape. See in the picture.
 Step 4:
Now cut the fringes with the help of fringes scissor or normal scissor.
Step 4:
Now cut the fringes with the help of fringes scissor or normal scissor.
 Step 5: Now cut design using Elegant Pocket Accents die at side of the lantern. As pictured.
 Step 6: Now adhere vellum
circles at the back of the doilies using red tape. As pictured.
Step 6: Now adhere vellum
circles at the back of the doilies using red tape. As pictured.
 Step 7:
Adhere vellum back of the side strip with clear glue. As pictured.
Step 8: Add magnets for closure.
Step 7:
Adhere vellum back of the side strip with clear glue. As pictured.
Step 8: Add magnets for closure.
 Step 9:
Attach decorative die cut strip fringes using clear glue with 1 doily by leaving 4” open. This is the flap to open the lantern and flame-less candle can be kept. Cut
extra part of decorative strip.
Step 9:
Attach decorative die cut strip fringes using clear glue with 1 doily by leaving 4” open. This is the flap to open the lantern and flame-less candle can be kept. Cut
extra part of decorative strip.
 Step 10: Before adhering
second doily, first check magnets closure working fine or not.
Step 10: Before adhering
second doily, first check magnets closure working fine or not.
 Step
11: Now adhere second doily. Magnet closure Lantern base is ready.
Step
11: Now adhere second doily. Magnet closure Lantern base is ready.
Like this create 2
lanterns. Distress the edges with memento Lilac posies.
Flowers:
For more tips on
creating flowers with Sweet Peony collection, watch the tutorial https://youtu.be/L9_MLkvpGPQ
For more tips on creating with the flower
shaping mold, watch the tutorial https://youtu.be/KDbdzC0MnAI

 Maroon sweet peony
flower: Stamps multiple flowers using small sweet peony stamp with archival
plum ink. Cut with coordinating dies. Color using lilac posies and archival
plum both sides. Add white thread stamens. Add glitter using dries clear glue. Create fillers with smallest petals and color using any yellow color. As pictured.
Maroon sweet peony
flower: Stamps multiple flowers using small sweet peony stamp with archival
plum ink. Cut with coordinating dies. Color using lilac posies and archival
plum both sides. Add white thread stamens. Add glitter using dries clear glue. Create fillers with smallest petals and color using any yellow color. As pictured.
 White Rose: Stamp
multiple classic rose flowers using archival pale ochre. Cut with coordinating
dies. Shape them using 3D shaping mold. create flowers. Add micro mini pearls
using dries clear glue.
White Rose: Stamp
multiple classic rose flowers using archival pale ochre. Cut with coordinating
dies. Shape them using 3D shaping mold. create flowers. Add micro mini pearls
using dries clear glue.


 Maroon roses: Stamp
multiple classic rose flowers using archival plum. Cut with coordinating dies.
Color with lilac posies, plum and cactus flower. Shape them using 3D shaping
mold. create roses. Add glitter using dries clear glue. Now add micro mini
pearls on tip also. Add glitters using dries clear glue.
Create two Small roses for fillers with small flower from classic rose. Color with Rose madder and tea rose archival ink. Create fillers using any smallest flower from any die cut. Color with any shade. Add wire stamens.
Maroon roses: Stamp
multiple classic rose flowers using archival plum. Cut with coordinating dies.
Color with lilac posies, plum and cactus flower. Shape them using 3D shaping
mold. create roses. Add glitter using dries clear glue. Now add micro mini
pearls on tip also. Add glitters using dries clear glue.
Create two Small roses for fillers with small flower from classic rose. Color with Rose madder and tea rose archival ink. Create fillers using any smallest flower from any die cut. Color with any shade. Add wire stamens.
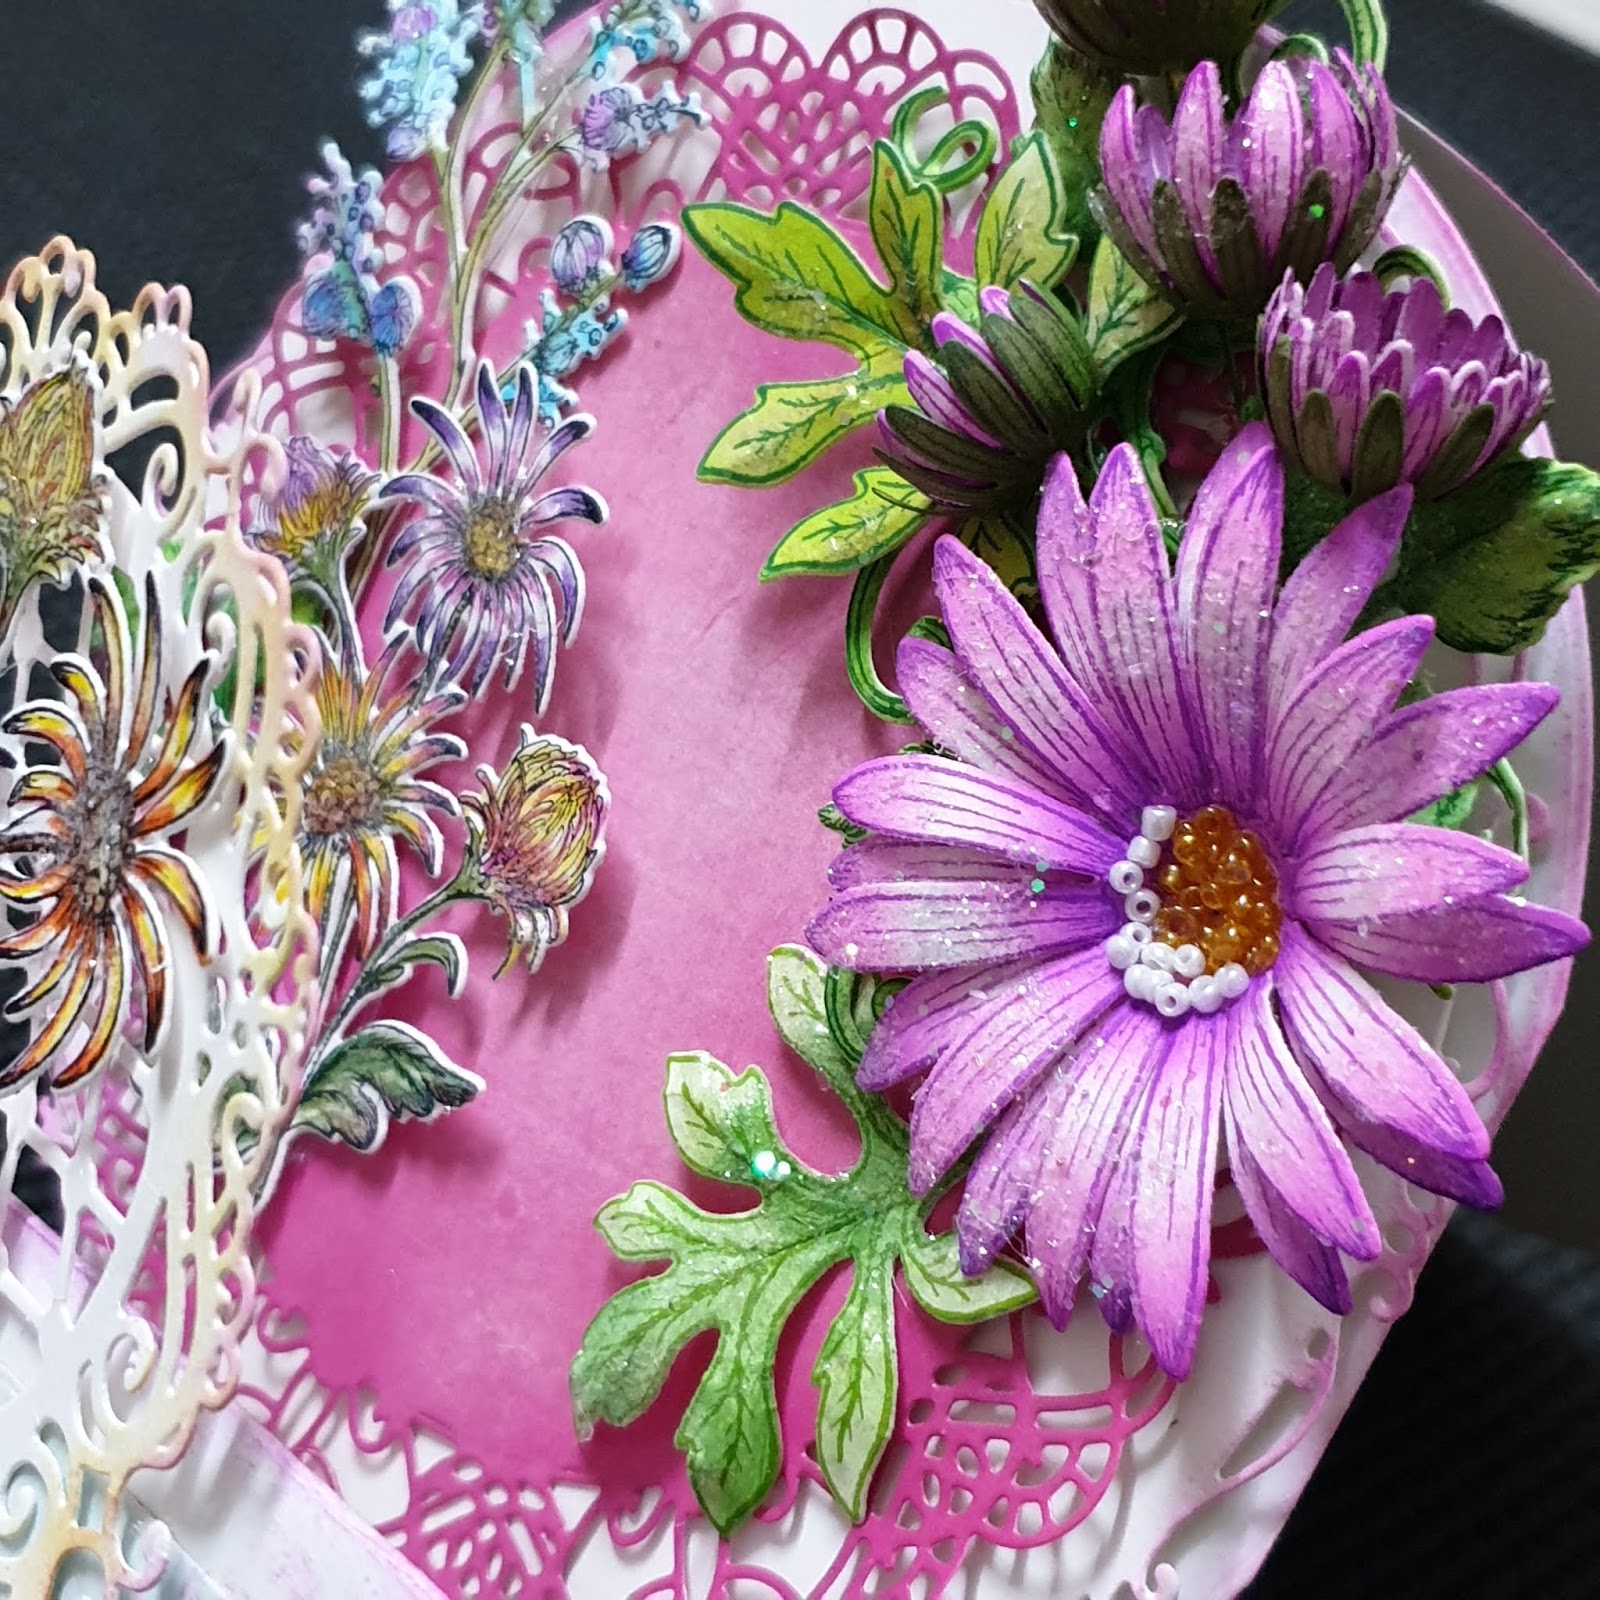
 Wild Aster: Stamp wild
aster flowers multiple times using archival vivid chartreuse and color with same. Cut
with coordinating dies. Turn the flowers face up and using a ball tool, make
circles in the center of the flower to curl the petals into an arch shape.
Adhere 3 petals together using the clear glue, offsetting the petals to create
a fuller flower add one inward flower like ball. As shown.
Create one flower with 2 medium petals and add one inward curl petal. Create medium flower using medium petals off set. Take 6mm Styrofoam bud color with plum add with white and yellow thread stamens. Create buds with small petals and Pierce a hole through the centers, add mini
pointed green thread stamen through, attaching with hot glue. As
pictured. Add crystal clear glitter using dries clear glue.
Wild Aster: Stamp wild
aster flowers multiple times using archival vivid chartreuse and color with same. Cut
with coordinating dies. Turn the flowers face up and using a ball tool, make
circles in the center of the flower to curl the petals into an arch shape.
Adhere 3 petals together using the clear glue, offsetting the petals to create
a fuller flower add one inward flower like ball. As shown.
Create one flower with 2 medium petals and add one inward curl petal. Create medium flower using medium petals off set. Take 6mm Styrofoam bud color with plum add with white and yellow thread stamens. Create buds with small petals and Pierce a hole through the centers, add mini
pointed green thread stamen through, attaching with hot glue. As
pictured. Add crystal clear glitter using dries clear glue.
 Stamp the leaves from the leafy accents cling stamp set using archival Library green and color using peeled paint and
library green. Stamp Pansy stamp using stazon olive green colur with same and leaf green and give touch of cactus flower archival ink. Cut
with coordinating die. Shape the leaves using the 3D Shaping mold. Add glitters using dries clear glue.
Stamp the leaves from the leafy accents cling stamp set using archival Library green and color using peeled paint and
library green. Stamp Pansy stamp using stazon olive green colur with same and leaf green and give touch of cactus flower archival ink. Cut
with coordinating die. Shape the leaves using the 3D Shaping mold. Add glitters using dries clear glue.

 When all the elements are ready decorate both lantern from both side in
desire manner with hot glue. As pictured
When all the elements are ready decorate both lantern from both side in
desire manner with hot glue. As pictured


I hope you enjoyed the tutorial. love to here from you.
Thanks for stopping by
Hugs
Madhu Bairoliya.

Step 1:
Take 2 pieces of 6x6 300 gsm DMC white cardstock and vellum sheets. Cut circle using
Rounded sunlight window die. As shown in picture.

Step 2:
Cut white circle cardstock using both designers die from Rounded Lattice Window
die.


Step 3:
Take 2 strips of white cardstock measure 3 ¼” x 12”. join both
with the help of red tape. See in the picture.

Step 4:
Now cut the fringes with the help of fringes scissor or normal scissor.

Step 5: Now cut design using Elegant Pocket Accents die at side of the lantern. As pictured.

Step 6: Now adhere vellum
circles at the back of the doilies using red tape. As pictured.

Step 7:
Adhere vellum back of the side strip with clear glue. As pictured.
Step 8: Add magnets for closure.

Step 9:
Attach decorative die cut strip fringes using clear glue with 1 doily by leaving 4” open. This is the flap to open the lantern and flame-less candle can be kept. Cut
extra part of decorative strip.

Step 10: Before adhering
second doily, first check magnets closure working fine or not.

Step
11: Now adhere second doily. Magnet closure Lantern base is ready.
Like this create 2
lanterns. Distress the edges with memento Lilac posies.
Flowers:
For more tips on
creating flowers with Sweet Peony collection, watch the tutorial https://youtu.be/L9_MLkvpGPQ
For more tips on creating with the flower
shaping mold, watch the tutorial https://youtu.be/KDbdzC0MnAI


Maroon sweet peony
flower: Stamps multiple flowers using small sweet peony stamp with archival
plum ink. Cut with coordinating dies. Color using lilac posies and archival
plum both sides. Add white thread stamens. Add glitter using dries clear glue. Create fillers with smallest petals and color using any yellow color. As pictured.


Maroon roses: Stamp
multiple classic rose flowers using archival plum. Cut with coordinating dies.
Color with lilac posies, plum and cactus flower. Shape them using 3D shaping
mold. create roses. Add glitter using dries clear glue. Now add micro mini
pearls on tip also. Add glitters using dries clear glue.
Create two Small roses for fillers with small flower from classic rose. Color with Rose madder and tea rose archival ink. Create fillers using any smallest flower from any die cut. Color with any shade. Add wire stamens.
Wild Aster: Stamp wild
aster flowers multiple times using archival vivid chartreuse and color with same. Cut
with coordinating dies. Turn the flowers face up and using a ball tool, make
circles in the center of the flower to curl the petals into an arch shape.
Adhere 3 petals together using the clear glue, offsetting the petals to create
a fuller flower add one inward flower like ball. As shown.
Create one flower with 2 medium petals and add one inward curl petal. Create medium flower using medium petals off set. Take 6mm Styrofoam bud color with plum add with white and yellow thread stamens. Create buds with small petals and Pierce a hole through the centers, add mini
pointed green thread stamen through, attaching with hot glue. As
pictured. Add crystal clear glitter using dries clear glue.

Stamp the leaves from the leafy accents cling stamp set using archival Library green and color using peeled paint and
library green. Stamp Pansy stamp using stazon olive green colur with same and leaf green and give touch of cactus flower archival ink. Cut
with coordinating die. Shape the leaves using the 3D Shaping mold. Add glitters using dries clear glue.


When all the elements are ready decorate both lantern from both side in
desire manner with hot glue. As pictured


I hope you enjoyed the tutorial. love to here from you.
Thanks for stopping by
Hugs
Madhu Bairoliya.