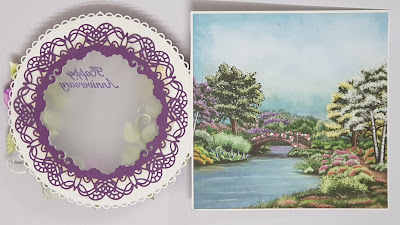
Happy Anniversary Window scene
HC Products
has been used:
Rounded Window Frame Die, HCD1-727
Rounded
Eyelet Window Die HCD1-7273
Tulip Time Die HCD1-7218
Tulip Time Cling Stamp Set, HCPC-3858
Cheery Pansy Die, HCD1-7222
Cheery Pansy Cling Stamp Set, HCPC-3862
3D Pansy Shaping Mold, HCFB1-473
Leafy Accents Die, HCD1-7193
Leafy Accents Cling Stamp Set, HCPC-3835
Leafy Accents Shaping Mold, HCFB1-467
Deluxe Flower Shaping Kit, HCST1-401
Window Scenes Paper Collection, HCDP1-2109
Rajni Chawla's Crystal Clear, PGM15015
Other Products: white card stock, Gold mirror cardstock, purple card stock, vellum sheet, Purple Tinsel embossing powder, hot glue, glue dot,Inks: Archival - Leaf Green, Majestic violet, Cactus Flower, Stazon Ink Olive Green, Distress wilted violet, Versamark water ink pad.
For more tips on creating with the Window Scene cards & dies, watch the tutorial at https://youtu.be/LnM95GR92ao.
Instruction: Ready side fold card size is 6" x6". Take 12"x 6" white card stock, score at 6" from longer side and fold. Set eyelet die from Rounded Eyelet window die extending over the top of the fold of the card base. Run the card through die cutting machine so when the card is opened it will still be intact. For window in front panel using 2nd and 3rd doily from Rounded Window Frame die and 2 more frame from golden and purple card stock using same set as pictured. Now Distress the card base with majestic violet and adhere golden window frame die cut with foam tape. cut one vellum round die cut bigger than center window stamp sentiment with varsamark water ink and add Purple Tinsel embossing powder, heat set. Adhere on window frame from back, glue purple window frame die cut on vellum as pictued. Adhere one window scene pattern paper from collection inside of the card with white outline all sides. As pictured.
For Flowers, stamp tulip flowers using cactus flower ink on white flower paper and cut with coordinating die. Sponge flowers using majestic Violet ink and cactus flower ink. Shape flowers using groove tool and layer it. 3 layers for one flower. Add Rock Candy stamens small to the center of flowers. Stamp Cheery Pansy leaves and leafy accents leaves using StazOn Olive Green ink on flowers paper. Cut with coordinating die and paint with leaf green archival, olive green stazOn, cactus flower archival for little bit red tone. Shape leaves using shaping mold. Glue flowers and leaves on card using hot melted glue. For finished look apply glitter on flowers using glue that dries clear.
Some more pictures...
Thanks for stopping by
Hugs
Madhu Bairoliya


