Beginner's Guide to Handmade Flower
Hi Friends,
Today I am here for GDT member of Prika
I am here to share a step by step tutorial of a beautiful handmade flower. I hope you all will like and enjoy it.
I will tell you how you can easily cut 7 petal flowers with simple fold, color them and shape them with some simple tools…. which we have at home.
Things required for the project:
➤ Thin paper for making templates
➤ Handmade or water color paper for flowers
➤ Scissor
➤ Pencil / Rubber
➤ Turquoise blue or any other
➤ Magenta or any other
➤ Hair dryer
Let’s start.
Step:1. First I will make template of all three sizes.
Take A4 sheet of computer paper or any thin paper which can be easily fold and cut into 3x3 2.5x2.5 and 1.5x1.5 square pcs.
Cut them accordingly pictures which has been shown in figure 1
Step:2. After template draw them on hand made paper or any other water paper and cut them like figure 2
3pcs of 3x3
2 pcs of 2.5x2.5 and
2 pcs of 1.5x1.5. Total seven petals
Step:3 and 4.
Before colouring dip petals in water. Use little bit blue acrylic colour with water and spread it on wet petals evenly. (Keep in mind petals should be wet otherwise acrylic colour gives you lots of patches because it dries very fast). This is very light colour due to excess water and dry it with hairdryer.
Again I spread water and coloured only at the edges of petals (figure 4 (7 no pic)) so colour will spread automatically. Refer figure 3 and figure 4
Step:5. Dry it using hairdryer. Again wet centre and spread magenta with water like figure 5. After colouring semi dry all the petals
Step: 6 and 7.
Shaping and assembling petals
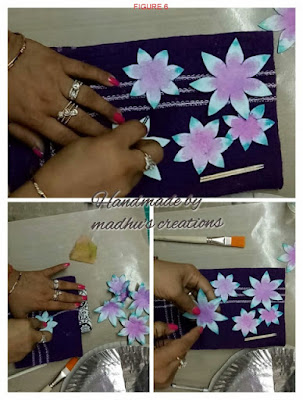
For shaping use towel and foam piece or bed mattress instead of embossing pad and instead of golf tool use wood toothpick (in figure 1 tie with thread) or wire little bit thicker or can be used compass, jurapin or wire like figure 6.
Dried all petals properly.
HUGS
...........................................................................................................................
Step:8 and 9.
using Fevicol or hot glue as shown in figure 9.
Here some more pictures have been attached for an idea.
Enjoy fast forward video….
Hope u all enjoyed the tutorial.
HUGS
...........................................................................................................................
Happy Crafting!!


No comments:
Post a Comment