Wednesday, 27 March 2019

Craftyscrappers Blog Hop

HELLO CRAFTY TOURISTS
WELCOME TO TOWN CRAFTYSCRAPPERS
We are proud citizens of town Craftyscrappers. Our crafty town is being run by Mayor.Konica Das and Deputy Mayor.Jesse Zedek.
This month we are celebrating 6th birthday of our town and we like to invite you to visit my crafty castle/museum/handmade store (choose any one). Every year, we have crafty tourists visiting our town and joining us in celebration.
We invite everyone to join us on this occasion and hop on & off our crafty bus.


Our blog bus runs from April 2 until April 16 and we have prizes for a lucky visitor on May 5, who will receive lovely gifts from us.
I welcome you to see one of my unique crafty creation made for this

    A brief tutorial:


  1. Take a white card stock 4 X 5.75 used golden heat embossing powder with scripted butterfly background.
  2. set layering stencil on white paper for flowers..... 
  3. yellow flower..... base with Buttercup shimmer paste, and after drying apply any two deep yellow distress ink.
  4. pink flower.....  Shimmer paste Cupcake any appy two dipper shades
  5. Blue flower..... base with Martina shimmer paste   apply any two dipper shade  
  6. leaves...... Simmer paste - Stem shade with distress ink pealed paint and mowed lawn
  7. Make center step card base with 6x7.5 white card stock. 
  8. Both side boder used white heat embossing powder using caftyscrappers border stamp set and apply three distress ink for color background.
  9. stamp balloons from Celebrate holi stamp set and fussy cut and stick on crafty scrappers element sheets
  10. Birthday tag with white heat embossing and distress background with marmalagoon ink.
  11. set all objects with blue matting paper on the card base.
  12. Add sentiment with foam tape.
  13. And the card is ready.   


Some closup look


Thank you for visiting my place. Hop on and get off at the next stop (MEENAKSHI SHANKAR) and enjoy marvellous master piece created for you.

Tuesday, 26 March 2019

Beginner's Guide to Handmade Flower by Madhu Bairoliya


Beginner's Guide to Handmade Flower 

Hi Friends,
Today I am here for GDT member of Prika
 I am here to share a step by step tutorial of a beautiful handmade flower. I hope you all will like and enjoy it.
I will tell you how you can easily cut 7 petal flowers with simple fold, color them and shape them with some simple tools…. which we have at home.
For beginner it is very good.

Things required for the project:
➤  Thin paper for making templates
➤ Handmade or water color paper for flowers
➤ Scissor
➤ Pencil / Rubber
➤ Turquoise blue or any other
➤ Magenta or any other
➤ Hair dryer
Let’s start.
Step:1. First I will make template of all three sizes.
Take A4 sheet of computer paper or any thin paper which can be easily fold and cut into 3x3 2.5x2.5 and 1.5x1.5 square pcs.
Cut them accordingly pictures which has been shown in figure 1


Step:2. After template draw them on hand made paper or any other water paper and cut them like figure 2


3pcs of 3x3
2 pcs of 2.5x2.5 and
2 pcs of 1.5x1.5. Total seven petals
Step:3 and 4.

Before colouring dip petals in water. Use little bit blue acrylic colour with water and spread it on wet petals evenly. (Keep in mind petals should be wet otherwise acrylic colour gives you lots of patches because it dries very fast). This is very light colour due to excess water and dry it with hairdryer.
Again I spread water and coloured only at the edges of petals (figure 4 (7 no pic)) so colour will spread automatically. Refer figure 3 and figure 4


Step:5. Dry it using hairdryer. Again wet centre and spread magenta with water like figure 5. After colouring semi dry all the petals
Step: 6 and 7.
Shaping and assembling petals
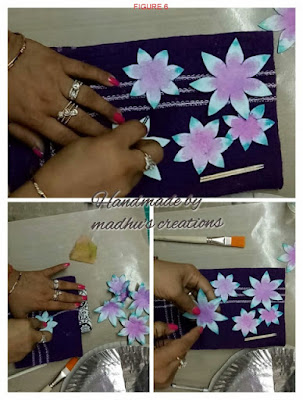
For shaping use towel and foam piece or bed mattress instead of embossing pad and instead of golf tool use wood toothpick (in figure 1 tie with thread) or wire little bit thicker or can be used compass, jurapin or wire like figure 6.

Drag wire or compass from tip to center for making veins.
Dried all petals properly.

Step:8 and 9.
Keep it on piece of foam, arrange the flowers glue them and pollens assembled

using Fevicol or hot glue as shown in figure 9.

Here some more pictures have been attached for an idea.
Enjoy fast forward video….
Hope u all enjoyed the tutorial.


HUGS

...........................................................................................................................
Happy Crafting!!

HOLI RAINBOW POP UP GREETINGS

HOLI RAINBOW POP UP GREETINGS

Hello Friends!!
I hope you all are doing well.
This is Madhu Bairoliya Creative Designer at craftyscrappers
and today I am here with my inspiration post for our ongoing challenge…


  • Take white card stock and stamp boy from HAPPY KIDS-BOYS  and CELEBRATE HOLI stamp set with black archival and color with water medium brush pen. and fussy cut.
  • Take black card stock 12x6 and fold i middle for 6x6 card base.
  • Do matting with golden yellow deep cardstock and after that this texture sheet  which i got when i was wipping my basket weave stencil.
  • Made Rainbow banner and attached with brads. VIBGIOR
  • Add all fussy cut on the top.


INDISE 


  • Take white 12x3.5 " 60 gasm card stock and first score at every 4/16 interval and do fanfold
  • second fan same process (stripes 12x2.5")
  • Third stripes 12x1.5"
  • when all fans are ready open them and color with water spay and color water color with brush effect of rainbow let it dry naturally or hair dryer.
  • Now glue fussy cutting of pop up fans according to the pictures.
  • Add sentiments.
  • Add twine closer 
  • And the card is ready.   


This is all from my side.
I hope you liked this project.
Do let me know how you like this project in the comments below.Until then Happy Crafting 🙂
Don’t forget to join in our craft challenges
(details at the beginning of the post)
You can  participate via Facebook, Instagram and even via email.
(While sharing your creation post over the social media, ie
Facebook/twitter/Instagram
please use #Craftyscrapperschallenge29 to qualify for submission,
failing to do so, the entry would be disqualified.) 

Thanks for stopping by.
Have a crafty day ahead !

Monday, 18 March 2019

COLORFUL RAIN HOLI CARD


COLORFUL RAIN

Hello crafty people!
I hope you all are doing well.
This is Madhu Bairoliya Creative Designer at craftyscrappers
and today I am here with my inspiration post for our ongoing challenge…


Thanks for stopping by.
Have a crafty day ahead !
Madhu Bairoli

Holi shaker card


Hello crafty people!

I hope you all are doing well.
This is Madhu Bairoliya Creative Designer at craftyscrappers
and today I am here with my inspiration post for our ongoing challenge…

Tutorial is Here:   Holi-shaker-card


Thanks for stopping by.
Have a crafty day ahead !


Tuesday, 12 March 2019

HAPPY EASTER

Happy Easter

Hello crafty Friend !!!!
Today I would love to share a Easter card with Heartfelt's dogwood Collection which is very beautiful and lovely collection.


Heartfelt Creations Products Used

fillers leaves from torpial paradise collction


Other Products: Archival inks- Plum, vibret fusiha pink peony, Leaf green, Library Green, sepia
Glossy accents, Foam tape, Brass 4pcs metal legs, art stone, prima gold color.

Watch this video https://youtu.be/gI8RqHAt3vE to learn different shaping techniques using the dogwood flowers.
Instruction:
Flowers; Stamp the dogwood flowers in Plum and vibrant fushia and Library green. Using a dauber, apply colors like pink peony and leaf green to the flowers. Cut with coordinating die and shape on the flower making tool kit. Apply glue and layer the flowers and put some green micro beads with glossy accents. Apply glitter. Stamp and cut the dogwood branch and color. Cut with coordinating die. Emboss and shape and cut into 2 parts.
Leaves:  stamp with library green and some with sepia. Color with leaf and fern green with touch of plum. Shape with leafy accent shaping mold.


 Measures the withe card base 6x6. Adhere pattern paper from designer paper pack, on the card bade.
Take dove die cut stamped with black archival cut with coordinating dies and dab clear glue and apply glitter on it.
once all the elements are ready adhere like cards.


Thanks for stopping by

hugs
Madhu Bairoliya