Showing posts with label Rounded window Frame. Show all posts

Monday, 2 March 2020

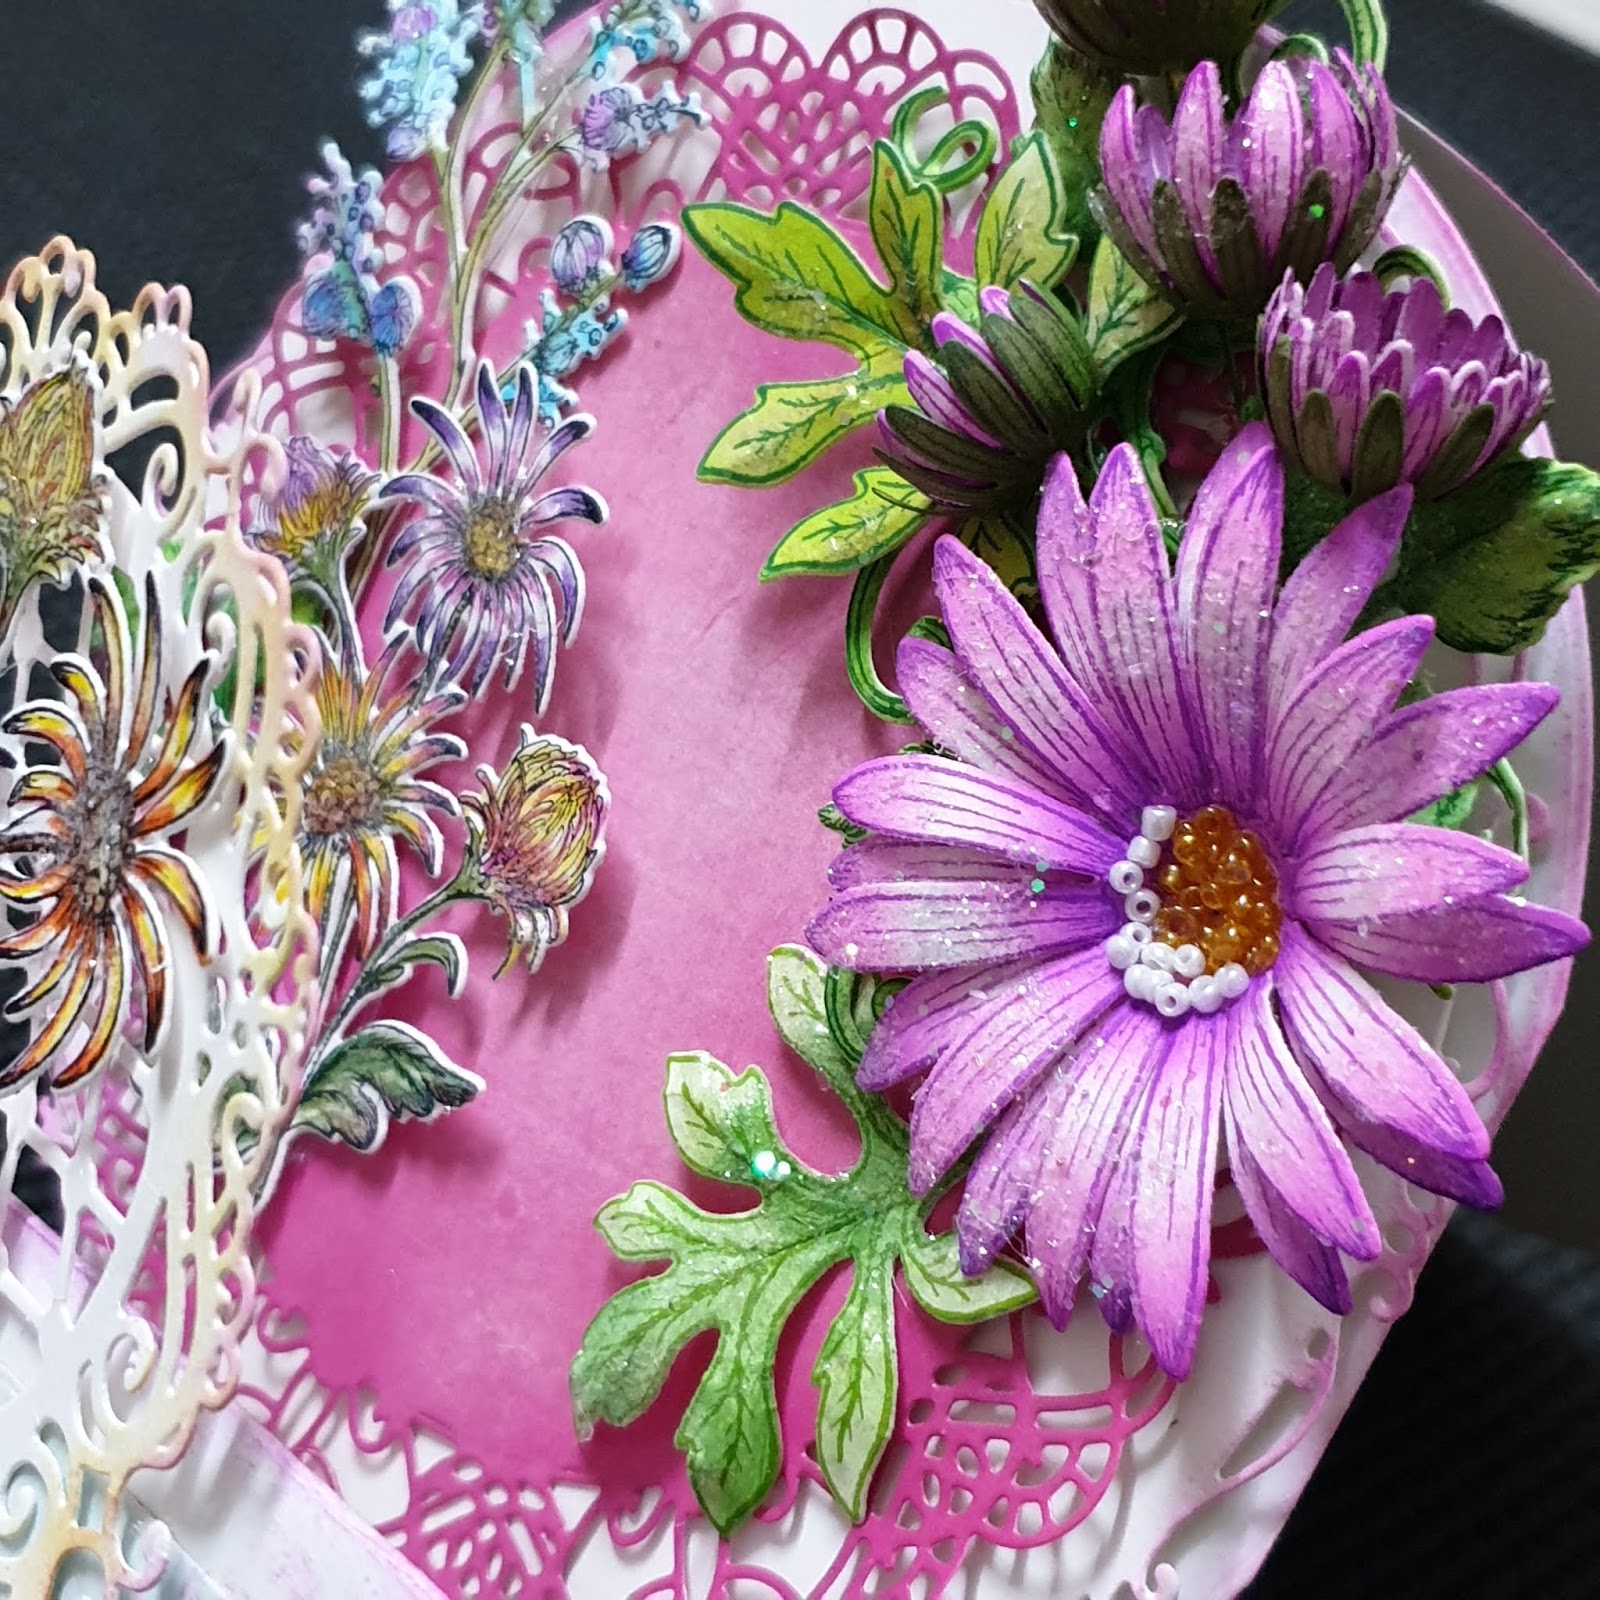
Glittery Aster's circle world!

Glittery Aster’s Circles World! 

Hello friends!
I am here with folded circle easel birthday card with some tips.


HC PRODUCTS USED: 
Rounded Window Frame Die, HCD1-727

Other products: Icraft flower shaping paper super white, white cardstock, pink card stock, pearls, glass beads, wire, hot glue, dries clear glue,
Inks: Archival – Cactus Flowers, Majestic Violet, jet Black, Library Green, Leaf Green, Memento: Lilac Posie, Colour pencils, Zig Marker

Products can be buy from
USA  Heartfelt Creations
INDIA crafterscorner
INDIA   Icraft Flower Paper

Note:  At the end of blog you will get some tips.


For more tips on creating with the Window Scene cards & dies, watch the tutorial at 

For more tips on creating with the Wild Aster Collection, watch the tutorial at https://youtu.be/1mriCKqh-Ac.

Instructions: Take a square card base 6” x 6”. Cut using Rounded Sunlight Window die extending over the top of the fold of the card. Run the card through die cutting machine so when the card is opened it will still be intact. Now cut 3 circles using same window die. Fold all 3 circles into half. Attach them together with the help of hinges. Also attach with 6x6 circle card base. Now card base is ready. See the picture it looks like this.


Cut circle card mats from Window Scenes Paper Collection using Rounded Sunlight window die. Cut them into half. To give some more creative look use 2nd large doily die cut as a stencil from Rounded Window Frame die. Do stenciling using Rounded window frame 2nd die as stencil with pink posie memento ink. Adhere on folded card mats. See the picture.


Now cut 3 dollies from white cardstock using 3rd and 4th doily from Rounded Window frame die. Distress the edged using sunflower and cactus flower archival inks. Cut one doily from deep pink card stock using 2nd largest die from Rounded Window Frame die. And distress the edge using memento Lilac Posie ink ans yellow ink. Glue these dollies on folded card as shown in the picture. Add half small pearls on doily net.

Stamp aster flowers on flower shaping paper using cactus flowers and majestic violet archival ink and cut with coordinating dies. Sponge flowers using cactus flower, shape flowers using ball tool. Layer big flowers and add yellow and white glass beads in center using clear adhesive. Create one flower inward fold as shown in picture Shape the small asters into bud form using two petals and single petal, and pair with green aster for a realistic bud look with wire stamens. For green aster stamp on green card stock with Library Green. Cut with coordinating dies.    
Stamp aster leaves using library green ink and cut with coordinating die. Paint leaves using leaf green ink. Shape leaves using ball tool. Stamp leaves with Leafy Accents Cling stamp set with Library Green, color with leaf green, cut with coordinating dies. Shape with 3D Leafy Accent Shaping Mold.   
Stamp image with Wild Aster Spray Cling Stamp Set with Black Archival and color with pencil color and zig marker. Cut with coordinating die.
Add crystal clear on flowers, leaves and sprays using dries clear glue.
Arrange flowers, leaves and sprays on all layers and glue them with hot melted glue. Add tag.
Enjoy more pictures.


Tip: for fast working I washed back of sheet with green water or acrylic paint. Like pictures...


For aster flowers, painted thin mauve paint to the back of petals and buds petals. Like picture...

If you liked put some comments in comment box.

Thanks for stopping By.
Hugs
Madhu Bairoliya


Sunday, 9 February 2020

Beauty In the simple things!

Beauty in the simple things!

 Hi friends!
I am here with another pink card with hand created backgrond.

HC products used:

Other Products: white cardstock, white and pink stamens, glitter, hotglue, dries clear glue, white satin twin, 3Dfoam tape, score board, 
Inks: Archival..Vibrant Fushia, Library Green, Leaf Green, Rose Madder, memento Lilac Posie.


Products can be buy from
India  Crafters Corner

For more tips on creating flowers with Sweet Peony collection, watch the tutorial
https://youtu.be/L9_MLkvpGPQ

For more tips on creating with the flower shaping molds, watch the tutorial
https://youtu.be/KDbdzC0MnAl


Instruction: Ready card size 6x6 tent fold card. 
Score front panel from back vertically, horizontally, Diagonally and some straight lines to create background. cut doily using Rounded Window Frame 2nd big die adhere on card base with 3D foam tape. Distress The edges with memento Lilac Posies as pictured.


Flower instruction……To create  peonies, stamp the images with vibrant Fushia archival ink using 'Sweet Peony stamp set. Cut the flowers with it's coordinating die. You will need 1 big flower using 4 big flower petals, for 1 small flower 3 medium small flower petals. Color with rose madder archival ink and used shaping mold.  Glue the layers with 'Aleen’s Fast Grab Glue' and set it aside for a minute. Prick a hole in the center of the flowers. Take white rock candy stamens for big flower and pink rock candy stamens for small flowers. Hold them in the center and wind a thread wire around the center of the stamens. Hold them tight and screw the wire and pass the bunch through the whole. Glue them tight using hot glue. Cut the threads of the stamens at the back and add a green color sepal made using 'Classic Sunflower Die' at the back of the flower. 

Leaves stamped with Archival library green and cut with coordinating die. Used dabber n dab with leaf green shape with shape using3D shaping mold. Adhere flowers and leaves using hot glue. Add only smallest net die cut using Rounded Window Frame die. Glue twin bow. Add glitter using dries clear glue and sentiment with foam tape.


Thanks for stopping by..
Loves and Hugs
Madhu Bairoliya


Saturday, 8 February 2020

Magnetic Love!

Magnetic Love!💗💗

Hey friends!
Good morning!!

I created shadow box and inside pocket to add tags and photos. I added lots of close up shots of flowers below. Hope you liked.


HC Products has been used:

Window Hinges Die, HCD1-7285
Feathery Swan DieHCD1-7276
Calla Lily DieHCD1-7275

Other products: white cardstock Golden mirror cardstock, 3mm satin ribbon, pearls, glass beads, floral wire, hot glue, dries clear glue,
Inks: Archival (Blue Bird, jet Black, Leaf Green) Memento: Grapes jelly, olive green, zig marker.

You can get all product in 

For more tips on creating with the Window Scene cards & dies, watch the tutorial at https://youtu.be/LnM95GR92ao.
For more tips on creating with the Calla Lily Collection watch the tutorial at https://youtu.be/VWKPoXjpiug.

Instructions: Take 12” x 6” white card stock and score longer side at 6”. Set 6” circle die extending over the top of the folded card. Run the card through die cutting machine so when the card is opened it will still be intact.
Fold top panel in half circle.  Cut one more circle for same card base size. Distress the edges with Bluebird ink. Cut two mats from the heartfelt designer paper collection (one from Calla Lily collection and one from dogwood) using one size small from the Basic circle die. Mat one on circle die cut and one inside the card base. Adhere mated circle on top panel using glue which has been folded in half for easel card. Take Die cuts one from white cardstock and one from gold mirror cardstock using the Rounded Eyelet Window die with decorative pieces and half circle. Glue golden die cut on front of the card and decorative white, distressed with Blue Bird ink, inside the card to create pockets as shown in picture. Glue golden doted stripe on it. Glue magnet and hide with lily image. Glue white half Pearls. Tags or photo pocket is ready as shown. Create one shadow box of 4”x4” and ½ in height. Adhere golden dotted strips on outer side and pattern paper top and inside of the shadow box. Add one magnet on it and hide with Lily image. Cut one doily from Rounded Window Frame Die using 3rd and 4th small decorative dies. Adhere shadow box front of the card and glue Doily back of shadow box as shown. Stamp images from the Feathery Swan set and color with Zig real brush pens. Cut with matching die. Adhere on shadow box using 3D foam tape. Add love sentiment from collection.
Flowers and leaves:  Stamp few Calla Lily using Archival Bluebird for flowers and cut them with coordinating die and color them with same. From back color with Archival Bluebird and Memento Grapes Jelly. Shape them using Calla Lily 3D Shaping Mold and twirl them as shown in picture. For flowers stamens bead white glass beads in wire and turn them in U shape, glue 2 thread stamens with them as pictured.  For buds cut few Calla Lily without stamp and color with Bluebirds, memento Grape Jelly and Leaf Green. Shape and twirl them. Add white thread stamens and white decorative pearl in center. For Leaves stamp with memento Olive Green and color them with archival ink- Leaf Green on the edges and center of leaves. Cut 2 hinges from green and golden cardstock, add magnet in-between. Hot glue two lilies and pearl on it as shown. Add crystal clear using dries clear glue. Now assemble all flowers, leaves, swirl and wired pearls. Add sentiment in shadow box on white square piece with 3D foam tape and magnets using two memento inks Bhrahmi Blue and Grapes Jelly. Add magnet back of the photo which can be easily stick in shadow box. As pictured
Enjoy more pictures bellow...


Hope you liked it.
Thanks for stopping By...
Hugs 
Madhu Bairoliya

OUR SON IS OUR WORLD

OUR SON IS OUR WORLD!

Hello friends!!!!!
A very good morning to all of you ....
Here is a layout with handmade flowers (Heartfelt Creations Wild Aster).  This is created for wonderful parent who has been blessed with son. He is the SUN of their Family.😊😊

Products can be buy from
India  Crafters Corner

Other products: White cardstock, mini micro pearl, glitter, clear dries glue, hot glue, double side foam tape, lace, floral wire, chipiz skeleton leaves, stamens, golden glass beads, blue flower pearl,
Inks: Archival (Sky Blue, Pale Ochre, Jet Black, Library Green, Leaf Green)
Distress: Wild Honey, Peeled Paint, Vintage Photo, Memento: Bamboo Leaves, Gray Flannel


Project size 12”x 12”
For the base of layout find a yellow pattern paper from the Wild Aster paper collection. Adhere it on thick chipboard. Distress the edges with distress ink Wild Honey and vintage photo. Glue cotton flower lace at right corner of the top. Glue cheese cloth on base (optional). Find green paper from the same collection, tear it in wave from. Drape the paper to create dimension. Now distress the edges with distressing tool and distress with peeled paint for darker look. Adhere it on base using hot glue. Find and cut out 2 tags from the same collection, mat on white cardstock and add satin twin to the top. Cut pattern paper 6x6 from window scene paper collection. Distress the edges with tool. Adhere with foam tape on tags As pictured. Cut doilies from Round Window Frame Die using one from 2nd big and two from 3rd one. Add glitter on all doilies using dry clear glue. Adhere big doily on 6x6 pattern paper with foam tape. Cut small doily from the middle and attach these with 3” brown circle (looks like oval). Add pictures on all doilies using 3D foam tape shown in picture. Now adhere corrugate paper and all doilies on base as shown.

Stamp the flowers with Wild Aster stamp on white card stock using Sky Blue and Pale Ochre. Color with same. Cut with coordinating die. For bigger flowers use 3 larger petals, off set. Now add golden glass beads and blue flower center using glossy accent as pictured. Medium flowers with 2 or 3 medium petals and also 2 medium and 1 inward fold. Pierce a hole through the centers, and thread blue and golden+yellow stamens through as pictured. Shape the small asters into bud form using two petals and single petal, and pair with green aster for a realistic bud look with wire stamens. For green aster stamp on green and white card stock with Library Green and leaf green, and color with Bamboo Leaves. Cut with coordinating dies. 
Stamp image with Wild Aster Spray Cling Stamp Set with Black Archival and color with red zig marker.
Stamp leaves with Leafy Accents Cling stamp set with Library Green, color with Bamboo leaves, cut with coordinating dies. Shape with 3D Leafy Accent Shaping Mold. Stamp Aster Leaves with Wild Aster stamp using memento Gray Flannel ink and color with same. Cut with coordinating die. Shape with pointed ball tool.
Twist some floral wires leaf green and made swirls. To create micro beads and glitter stamens first apply glossy accent on white wire stamens, and add micro beads and glitter on them, let them dry. Add photos on all three panels.  Arrange all the elements (flowers,leaves,swirls, micro beads and glitter stamens) in desired manner and secure with hot glue. Add water drop lets and art stone using glossy accents as pictured. For the final touch add crystal clear and sparkling dust on the flowers using adhesive that dries clear.
Enjoy more closeup look...


Hope you liked it. Would love to hear from you.
Happy crafting
Madhu Bairoliya


Thursday, 23 January 2020

Happy Anniversary window scene

Happy Anniversary Window scene

Other Products: white card stock, Gold mirror cardstock, purple card stock, vellum sheet, Purple Tinsel embossing powder, hot glue, glue dot,Inks: Archival - Leaf Green, Majestic violet, Cactus Flower, Stazon Ink Olive Green, Distress wilted violet, Versamark water ink pad.

For more tips on creating with the Window Scene cards & dies, watch the tutorial at https://youtu.be/LnM95GR92ao.

Instruction: Ready side fold card size is 6" x6". Take 12"x 6" white card stock, score at 6" from longer side and fold. Set eyelet die from Rounded Eyelet window die extending over the top of the fold of the card base. Run the card through die cutting machine so when the card is opened it will still be intact. For window in front panel using 2nd and 3rd doily from Rounded Window Frame die and 2 more frame from golden and purple card stock using same set as pictured. Now Distress the card base with majestic violet and adhere golden window frame die cut with foam tape. cut one vellum round die cut bigger than center window stamp sentiment with varsamark water ink and add Purple Tinsel embossing powder, heat set. Adhere on window frame from back, glue purple window frame die cut on vellum as pictued. Adhere one window scene pattern paper from collection inside of the card with white outline all sides. As pictured.
For Flowers, stamp tulip flowers using cactus flower ink on white flower paper and cut with coordinating die. Sponge flowers using majestic Violet ink and cactus flower ink. Shape flowers using groove tool and layer it. 3 layers for one flower. Add Rock Candy stamens small to the center of flowers. Stamp Cheery Pansy leaves and leafy accents leaves using StazOn Olive Green ink on flowers paper. Cut with coordinating die and paint with leaf green archival, olive green stazOn, cactus flower archival for little bit red tone. Shape leaves using shaping mold.  Glue flowers and leaves on card using hot melted glue.  For finished look apply glitter on flowers using glue that dries clear.
Some more pictures...


Thanks for stopping by
Hugs 
Madhu Bairoliya