Showing posts with label Cards. Show all posts

Friday, 7 February 2020

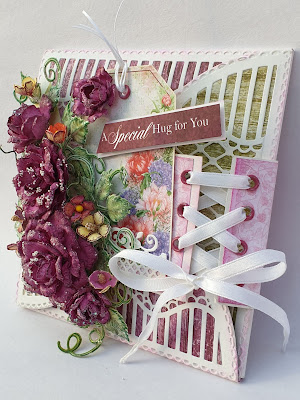
Special Hugs on Belly Band

 Special Hugs on Belly Band!🤗🤗

Hello Friend!!
I am here with very lovely card fill with all my love for my Husband. we completed 23 years of togetherness on 5th February 2020. He was super happy to get this lovely card. 💗💝

HC products:
Rounded Sunlight Window Die  HCD1-7272
Classic Rose Die, HCD1-7110
Classic Rose Cling Stamp Set, HCPC-3752
Classic Rose Paper Collection, HCDP1-270
3D Rose Shaping Mold, HCFB1-462
Leafy Accents DieHCD1-776

Leafy Accents Cling Stamp Set, HCPC-3835 
Leafy Accents Shaping Mold, HCFB1-467

Rajni Chawla's Crystal ClearPGM15015

Other Products: white card stock for flowers and card base,hotglue, dries clear glue, wire stamens, micro mini pearls, satin twin, satin ribbon, 4mm eyelets
Inks: Archival Ink; plum, Leaf Green, Library Green, Sunflower, Lilac posies, Cactus Flower


Ready card measures 6” × 6”. First cut 6x6 card stock. To make interlocking cards take white cardstock
cut 2 circles using Rounded Sunlight Window Die. Score both circles from center and make them 4 half
circles. Cut 4 hinges and add one part with half circle and another with base. as shown in pictures. 


Cut 4 half circles using die cuts from window scene paper collection. Adhere them on created interlocking card base. Cut Half circle decorative die cuts from white cardstock using dies. Distress die cuts with cactus flower ink and mat them on top as shown. 


Cut 4 half circles using die cuts of scenes from window scene paper collection. Adhere them inside of interlocking card half circles and one on base. Make matted belly band and add make holes using eyelets at both ends of band. Make pocket using border die cut for tag as shown in picture.


For flowers stamp Classic Roses on white flower paper with archival Plum multiple times. Cut with coordinating die. Color with plum, Lilac Posies and Cactus Flower front and back both. For fillers add Archival Sun Flower. Shape them using shaping mold. For big rose use 3 big flowers 2 medium flowers and 2 flowers 3rd big. Add micro pearls using dries clear glue. Add glitter too. Stamp Leaves on white paper using Leafy accent stamp set with archival Library Green and cut them coordinating dies. color using Leaf Green  and Cactus flower. Shape them using Leafy Accents 3D Shaping mold. Add glitters with dries clear glue. Arrange all flowers and leaves on a band as pictured


And glue it on Belly Band with hot glue , but keep in mind pocket should not be glued. Add small rose bud, satin twin and sentiment on tag. Tie white satin ribbon in eyelets holes as pictured.


Stamp Rose image  on white paper and color with pencil color and water color brush pen. Cut one heart using heart dye cut from my stash. Distress the edges with Cactus Flower and adhere it with foam tape. hot glue color image Add picture or sentiment in Heart shape.


Some more pictures are here with closeup look 


Hope you enjoyed the tutorial.

Thanks for stopping by
Hugs
Madhu Biroliya

Saturday, 1 February 2020

My Heart Belongs to You

MY HEART BELONGS TO YOU!❤❤

Hello everyone!
I am here with valentine card which I made for Happy Craft Challenge Blogs using Heart-balloon-girl
digi image from Lemon short bread digis. from sharing my Tent fold card.

This is  6x6" tent fold card which is mated with black embossed cardstock and pick half inch checked from my stash with foam tape and colored with wax colours. I printed Digi image from computer and colored with pencil colors and balloon with water color  Zig brush pen. Fussy cut and adhere it with 3D foam tape. Added sentiments.
Decorated with heart shape sequences, satin twine and glitters.


Thanks for stopping By
Hope you all liked the card
Keep crafting to stay happy😊😊
Madhu Bairoliya

Entering In

Tuesday, 21 January 2020

Thinking Of You!!!...Bendi Card

Thinking Of You!!!....Bendi Card

Hello Crafty friends!!!

Today I would love to share a Thinking of you!!! Bendy Card which I made with Heartfelt Creations Collection This is my first bendi card. It was really fun!!!


Here is my card:
Heartfelt Creations Products has been used:
Tweet Cherry Blossoms Die, HCD1-7230
Cherry Blossom Retreat Cling Stamp Set, HCPC-3867

Cherry Blossom Retreat Die, HCD1-7231
Woody Landscape Die, HCD1-7122
Woody Treescape Stamp, HCPC-3766

PRODUCTS Store link:
IN USA Heartfelt Creations
In India  CRAFTERS CORNER

Other Products: White card stock, water color pencils, scoring board, die cutting machine, stamens, nail art pink mini micro beads, handmade water droplets, satin twine
Inks: Spun Sugar and worn lipstick Distress ink, Archival Jet Black
For more tips on creating with the Cherry Blossom Retreat collection, watch the tutorial at https://youtu.be/OaA2da5H-E0.
For more tips on creating with the flower shaping molds, watch the tutorial at https://youtu.be/FSdPL7nXvQE.

Instructions: Bendi card mesure 6” by 7-1/8”
Create a Bendy-Card by following these easy and wonderful instructions by Bibiana, check tutorial here. I alerted the instructions by using the Border Basics die rather than cutting the flaps freehand. Choose a pattern paper from Cherry Blossom Retreat Paper collection and cut it for layering the flaps with deep pink cardstock.
For border I used border punch from Dress My Craft.
Take white card stock ½” smaller than base paper and distress whole paper with spun sugar, worn lipstick and candid apple. Now stamp peony flower from Peony Bud and Blossom Cling Stamp. Mat with deep pink card stock on white card base.
Stamp images from Cherry Blossom cling stamp with Black Archival and cut them with coordinating die, color them with pencil. Shape them with ball tool.
Cut flowers from Christmas Poinsettia & Holly Die. Color center and tip with spun sugar and Shape them with 3D mold. Off set petals and glue flowers together and piercing a hole in the center of each flower and add white and pink thread stamens in center. Apply glitter on it. Stamp trees from Woody Treescape Stamp, cut with coordinating die. Add clear glue on small trees, add micro pearls. Glue trees, flowers and leaves on the card base using hot glue as shown in the pic. Add bird house and hanging sentiment, few birds from cherry blossom. Adhere them on the card using dimensional tape as shown in the pic. Add water droplets with glossy accent. Hot glue twine bows.
Some more close pics:


Thanks for stopping by
Hugs
Madhu Bairoliya


Friday, 3 January 2020

Calla Lily Booklet Desk Calendar 2020

Calla Lily Booklet Desk Calendar 2020!


Hi Friends!!
Happy New Year! I have a creative idea for you. This is my first project for year 2020
Calla Lily Desk calendar 2020.  This project is perfect as a gift or a piece of home decor it's up to you!

Heartfelt Creations crafters say:

"Heartfelt Creations cards are amazing... fabulous stamps, dies and the best ever flowers using the shaping kit. Also the paper pads are many with fabulous prints for all occasions" - Bev Code

These are the supplies I used. 

Heartfelt Creations Products:


Inks: Archival ink- Library Green, Vibrant Fuchsia, Leaf green, Jet Black
Distress ink Peeled Paint, Memento Bamboo leave,

Other Products: White Dress My Craft Floral Oriental Collection Paper, golden mirror sheet, Score-Board, DMC Satin twine, wire, magnets, pollen,

For more tips on creating with the Calla Lily Collection watch the tutorial at https://youtu.be/VWKPoXjpiug.

For more tips on creating with the booklet frame dies, watch the tutorial at https://youtu.be/kJO5LdNFxgE.


products can buy from USA HEARTFELT CREATIONS
Products can buy in INDIA CRAFTERS CORNER


Instruction:
Size of calendar is 8-1/4” by 6”
The most important is for it base cardstock I used 2 A4 sheets.

Calendar Base: Cardstock 8-1/4" x 11-3/4". Score at 1/2"(this is the hinge), 6-1/2”, 8-1/2", 10-1/2" and fold all 2” score line zig zag. Cut cardstock 8-1/4” by 6”. Adhere the both edges using red tacky tape. Now base is ready.
Take white cardstock 1/8” smaller than base, mat on calendar base. Take 1/8” small pattern paper from the collection distress the edges mat on it with 3D foam tape.

Flowers:  Now stamp Calla Lily flowers on white Dress My Craft Paper Floral oriental paper using Memento Bamboo Leave, cut them with coordinating die and color them with Archival Vibrant Fuchsia and Bamboo leaves both sides. Stamp Leaves with StazOn Olive Green and color with Leaf Green and Memento Bamboo Leaves, cut with coordinating die. For Leaves color them with StazOn Bamboo Leaves on the edges of leaves. Shape them using Calla Lily 3D Shaping Mold. For flowers, twirl them. Adhere the stamen to the lily center using the hot glue gun. Add stamen and Rajni chawala's crystal clear glitter. 

Now Stamp Swan and Calla Lily Spray image from Feathery Swan Cling Stamp Set on white cardstock using archival ink-Jet Black, cut with coordinating die and color it with Zig Clean Color Real Brush Markers. Add crystal clear glitter using dries clear glue.
Now for calendar numbers tiles 0 to 9 die cut and 1, 2, 3 need one more extra. Take two of 1" circles distress the edges, taped magnets in between circles and adhere numbers on it. Print days and months from computer and create like a flag, attach with wire.
Once the Calla Lilies, leaves and all elements are rady, Raindrops On Roses golden die cut make it half from middle and glued on the calendar booklet base. Arrange flowers leaves sprays using hot glue as pictured.
NOW MULTI STYLE CALENDAR IS READY.
Some more views...


Thanks for stopping here.
Hugs
Madhu Bairoliya

Monday, 9 December 2019

CHRISTMAS PENGUINS!!

Christmas Penguins With Snowy Flowers🎄🐧

Hi Friends!!

Today I am creating snowy flower with a little bit twist. Christmas is around the corner. Are you looking to create something different? Create a christmas card in easy way for your friends and family.


HC Products used:

HCD1-7229 Diamond & Lace Die
HCD1-7246-Fancy-Fold Pocket & Accents Die
HCD1-779-Regal Boarder & Pocket Die
HCDP1-2105Candy Cane Cottage Paper Collection
HCD1-7254 Merry Moments Die
HCD1-7255S season of Glee Die
HCD1-766 sparkling Poinsettia Die
HCD1-7133 Monkeying Around

You can get all product in 
USA  heartfeltcreations.us/shop
INDIA  crafterscorner.in

OTHER PRODUCTS :
White cardstock,  Red cardstock, Deep green cardstock, Berry stamens red and silver, silver crystal stamens, Dress my craft sparkling Dust, clear silicon glue, Red Geranium Archival ink, Distress ink

Instruction: Ready side fold card measures 6”×6”.  Die cut a piece of white card stock using the Diamond & Lace Die and Regal Boarder & Pocket Die. Distress the Diamond & lace die cut with distress ink candid apple and spun sugar and adhere  the die cut on the card base as shown. In rest part adhere any left over piece from pattern paper distress the edges from distressing tool and glue Regal border die cut on it. Now card base is ready.


Flowers Instruction: 
Foe white flower cut 3/4 inch circle, 4pcs from Floral Fold Pocket & Accents die and mist with water do zigzag fold from the bottom and glue all the petals in circle. Add stamens in center. Now white flower is ready.


For red flower cut two sets from Sparkling Poinsettia Die. Apply Red Geranium Archival ink on the edges and in center with dabber. Use a pointed tool from the Deluxe Flower saping kit.Shaping kit to shape the petals. Place the tool at the center of the petal, press down with an even pressure and roll the ball tool to the base of the petal with one stroke.
Adhere 2 sets of same size petals together (For Big flower two petals from medium petals and for small two small petals) and make flowers. using the clear glue, offsetting the petals to create a fuller flower and for center use white and glittery green stamens and make a hole in center of flower and insert stamens. Apply clear glue and add Rajni Chawala Frosting Powder. For more snowy look mix Dress My craft sparkling dust in clear glue and apply with toothpick on edges of the flowers and let it dry. Cut white and deep green leaves using Monkeying Around die.

Arrange all elements in desired manner and glue with hot melted glue and clear glue. Add Penguins die cut from candy cane paper collection on the left crone of card using 3D foam tape. Cut a sentiment from paper collection and hang on the card using rad and white cord as shown.


I hope you like it....
Thanks for stopping by...
Hugs...
Madhu Bairoliya


Wednesday, 17 April 2019

FOR YOU AND ALWAYS

Hello Friends!!!
Today I am sharing mini album. I used Dress My Craft paper pack 《FOR YOU AND ALWAYS》

This is 6x6 album with belly band, envelopes, pocket, Waterfall for photos and tags.
All the pages are very interactive.
I hope you liked it.

This is just a glimpse of this beautiful love album.
It will be fun watching this video and I hope you all like it...

Photo video For You and Always

Thanks for stopping.

Madhu Bairoliya

Monday, 18 March 2019

Holi shaker card


Hello crafty people!

I hope you all are doing well.
This is Madhu Bairoliya Creative Designer at craftyscrappers
and today I am here with my inspiration post for our ongoing challenge…

Tutorial is Here:   Holi-shaker-card


Thanks for stopping by.
Have a crafty day ahead !


Tuesday, 12 March 2019

HAPPY EASTER

Happy Easter

Hello crafty Friend !!!!
Today I would love to share a Easter card with Heartfelt's dogwood Collection which is very beautiful and lovely collection.


Heartfelt Creations Products Used

fillers leaves from torpial paradise collction


Other Products: Archival inks- Plum, vibret fusiha pink peony, Leaf green, Library Green, sepia
Glossy accents, Foam tape, Brass 4pcs metal legs, art stone, prima gold color.

Watch this video https://youtu.be/gI8RqHAt3vE to learn different shaping techniques using the dogwood flowers.
Instruction:
Flowers; Stamp the dogwood flowers in Plum and vibrant fushia and Library green. Using a dauber, apply colors like pink peony and leaf green to the flowers. Cut with coordinating die and shape on the flower making tool kit. Apply glue and layer the flowers and put some green micro beads with glossy accents. Apply glitter. Stamp and cut the dogwood branch and color. Cut with coordinating die. Emboss and shape and cut into 2 parts.
Leaves:  stamp with library green and some with sepia. Color with leaf and fern green with touch of plum. Shape with leafy accent shaping mold.


 Measures the withe card base 6x6. Adhere pattern paper from designer paper pack, on the card bade.
Take dove die cut stamped with black archival cut with coordinating dies and dab clear glue and apply glitter on it.
once all the elements are ready adhere like cards.


Thanks for stopping by

hugs
Madhu Bairoliya